Email Notifications

 |
OPTIONAL FEATURE - Contact your
RizePoint representative to enable/disable this option. |
The EMAIL NOTIFICATION section of the Waiver Management system is where
you define the content of email messages that are sent at various stages
of the approval process.
This section requires two steps:
| SETTING
UP THE CORRESPONDENCE TEMPLATES |
You'll need to set up several correspondence templates. Note that some
standard blank templates may have been created for you by RizePoint, but
you'll still need to define the text contained in the email message.
The following email templates are required to complete the automated
Email Notification setup.
- WaiverNotification
- When a waiver is placed in a queue awaiting approval, this template
defines the email that is sent to the user assigned to the role associate
with that queue.
- WaiverQueueEscalation
- If a waiver remains in a queue longer than specified in the queue's
Escalation Threshold, this template defines the email that is sent
to the user assigned to the role associated with that queue.
- WaiverQueueWarning
- If a waiver remains in a queue long than specified in the queue's
Warning Threshold, this template defines the email that is sent to
the user assigned to the role associated with that queue.
- WaiverWorkflowEscalation
- If the approval process exceeds the time specified in the workflow's
Escalation Threshold, this template defines the email that is sent
to the user assigned to the role associated with that queue.
- WaiverWorkflowWarning
- If the overall approval process exceeds the workflow's Warning Threshold,
this template defines the email that is sent to the user assigned
to the role associated with that queue.
- WaiverApproval - Once
a waiver has been approved, this template defines the email that is
sent to the primary contact associated with the location requesting
the waiver.
- WaiverDenial - If a
waiver is denied, this template defines the email that is sent to
the primary contact of the location requesting the waiver.
- RequireAdditionalInfo
- (optional) If additional information is required before a waiver
can be approved, this template defines the email sent to the location
that initiated the waiver. This template is optional, as you may simply
create a new email without using a predefined template.
To create the required correspondence
templates:
- Log on as a user with AUTOMATED FEEDBACK ADMINISTRATION permission.
- Go to System > Correspondence > Templates.
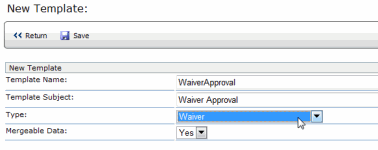
- Click the NEW button.
- Enter a name and subject. (Note that the names displayed above
are only suggestions. You may use any naming convention you wish for
your templates. However, it is recommended that you use a descriptive
name to avoid confusion.)

- Select WAIVER from the Type droplist.
- Click the SAVE button.
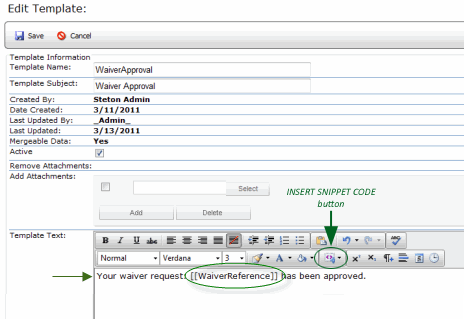
- Click the EDIT button.

- You may edit the Template Name if you wish, or change the ACTIVE/INACTIVE
status of the template.
- In the TEMPLATE TEXT field, enter the text of the email message.
Note that you may use replacement tags in the
body of the email message. Click the SNIPPETS button to select a replacement
tag from the list. All replacement tags for this template type appear
in the droplist.

- Click the SAVE button.
- Click the RETURN button to return to the list of templates.
The list of templates is displayed.
Notice the entry in the Template Type field.

| CONFIGURING
WAIVER NOTIFICATIONS |
Once you've created the various templates required, you'll need to associate
each template with a notification type to determine which email gets sent
at various stages throughout the approval process.
To
configure waiver notifications:
- Log on as a user with WAIVERS - WORKFLOW ADMINISTRATION permission.
- Go to System > Policies & Waivers > Configure
Waiver Notifications. A list of all notification types is
displayed.
- Click on a notification type to select it.
 |
When a
waiver expires, the type will automatically change from Approved
to Expired. This could potentially trigger an email notification
to the requestor and/or added recipient depending on settings. |
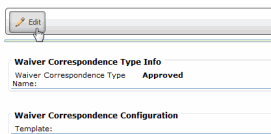
- Click the EDIT button.

- You may change the Type Name, if desired.
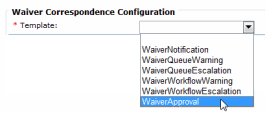
- Select a correspondence template from the droplist. All templates
with a Template Type WAIVER appear in the droplist.

- Click SAVE.
Whenever a waiver is placed in a queue, an email notification is automatically
sent to the person responsible for approving the waiver.
| Troubleshooting
Email Notifications |
Waiver notifications
are designed to send an automatic email notification, from a queue, to
approvers assigned to a specific role for each level of approval/decline.
When all approval levels have been completed, the system sends an approve/a
decline notification to the requester and primary contact.
If you have
followed all of the setup instructions and your email notifications are
still not being sent correctly, first check to verify you have entered
the correct email addresses for notification. Secondly, check the
following setup configurations:
To troubleshoot approver notifications:
1 - Go to
System > Manage People > Roles
> verify Waiver role(s) has been created.
2 - Go to
System > Manage People > Roles
> Waiver Role(s) > verify the user(s) has been assigned to
the role(s).
3 - Go to
System > Manage People > Users
> verify the user(s) has been assigned to waiver role(s) and
have email addresses.
4 - Go to
System > Policies & Standards
> Configure Waiver Queues > verify Role assigned to queue
& Send Notification is set to Yes.
5 - Go to System
> Policies & Standards > Configure Waiver Workflows >
verify the appropriate queues are selected in workflow General Info and/or
Steps tabs.
6 - Go to System
> Policies & Standards > Configure Waiver Notification >
verify the Waiver Template is assigned and the Send Notification is set
to Yes.
7 - Go to System
> Correspondence > Templates > search for the Waiver Template
assigned to Waiver Notification, then verify the template exists and has
an active status.
To troubleshoot requester
notifications:
1 - Go to
System > Locations > Contacts >
verify the Location has a primary contact who has an email address.
2 - Go to
System > Locations > verify
user requesting Waiver has an email address.
3 - Go to
System > Policies & Standards
> Configure Waiver Notification > verify the Waiver Template
is assigned and the Send Notification is set to Yes.
4 - Go to System
> Correspondence > Templates > search for the Waiver Template
assigned to Waiver Notification, then verify the template exists and has
an active status.
REPLACEMENT TAGS
When the Waiver Management System is enabled, the following
replacement tags are added to the system. These tags may be used
in the body of the email template:
- [[Waiver Reference]] - displays the Waiver Reference assigned
to a waiver.
- [[Waiver Status]] - displays the current status of the
waiver request.
- [[Waiver Rationale]] - displays the rationale for requesting
the waiver.
- [[Waiver Creation Date]] - displays the date on which the
waiver request was initiated.
- [[Waiver Completed Date]] - displays the date on which
the waiver approval process was complete (either Approved
or Rejected).
- [[Waiver Expiration Date]] - displays the date on which
the waiver will expire.
- [[Waiver Modified Date]] - displays the date of the last
change to this waiver.
- [[Waiver Account]] - displays the Location Name that requested
the waiver.
- [[Waiver Account ID]] - displays the Location ID that requested
the waiver.
|

ref:
Waivers


