Setting Up the Necessary Roles

 |
OPTIONAL FEATURE - Contact your
RizePoint representative to enable/disable this option. |
Roles are used to determine who is able to approve the waiver at each
step during the approval process. Each standard is associated with a role.
In addition, each queue, or step in the approval process, is also associated
with a role. When a waiver on a standard is requested, it is placed in
a queue, and the user assigned to the role associated with the queue receives
notification. Once the waiver has been approved, it moves to the next
queue, and the user assigned to the role associated with the next queue
receives notification, and so on.
When using multiple levels of approval, you'll need a separate role
for each level of approval. Typically you'll want only one user assigned
to each role, as only one user needs to approve the waiver at each level.
Be sure the role has the permissions necessary to view and approve waivers.
 |
When setting up roles, it is advised that
you also make use of the MANAGED ROLES option. (If this option
is not already enabled, you may contact your RizePoint representative
to enable it for you.) The user who creates a role is always automatically
assigned to the role. However, the Managed Roles option allows
the user to remove him/herself from the role after creating it,
and still be able to manage the role. One of the purposes of creating
an approval role is to provide a user with email notification
that a waiver is awaiting approval. In most cases, the person
who is managing (creating) these roles does not need, or want,
to be notified each time a waiver is awaiting approval, so removing
himself/herself from the role eliminates this problem. |
In addition to basic roles for approving a waiver, you may also want
to set up a pre-queue role, a post-queue role, and an escalation role:
- PRE-QUEUE: This role is used when you want someone to have access
to a waiver before it actually begins the approval process. If the
designated workflow includes a queue defined as a pre-queue, then
the waiver is placed in a pre-queue first, and notification is sent
to the user assigned to the pre-queue role. When this feature is used,
it is the first step in the approval workflow.
Note that this role is required for the AD HOC workflow type. Also
note that if you're going to use the AUTOMATIC workflow type and you
want to use a pre-queue, you must create this role first,
as the automatic workflow looks ONLY at the order in which a role
is created to determine the sequence in which the workflow progresses.
- POST-QUEUE: This role is used when you want someone to have access
to a waiver at the end of the approval process. If the designated
workflow includes a queue defined as a post-queue, then the waiver
is placed in a post-queue at the end of the approval process, and
notification is sent to the user assigned to this role. When this
feature is used, it is always the last step
in the approval workflow. Note that if you're going to use the AUTOMATIC
workflow type and you want to use a post-queue, you must create this
role last, as the automatic workflow looks
ONLY at the order in which a role is created to determine the sequence
in which the workflow progresses.
- ESCALATION: This role is used when you want to handle waivers that
remain in any given queue longer than a predetermined amount of time.
If a waiver is not approved within a specified time, it is removed
from the current queue and is placed in an escalation queue. The user
assigned to this role then has the responsibility for final approval.
For example, if you want three levels of approval, plus and Pre/Post
approval, and one to handle overdue approval requests, you would need
to create the following roles:
- APPROVER #1 ROLE - a role for first approver
- APPROVER #2 ROLE - a role for second approver
- APPROVER #3 ROLE - a role for third approver
- PRE-QUEUE APPROVER ROLE - a role for the pre-queue approver
- POST-QUEUE APPROVER ROLE - a role for the post-queue approver
- ESCALATION APPROVER ROLE - a role for handling waivers that remain
in a queue too long
|
The role names shown above are just suggestions.
You may use any naming convention you want, but using a descriptive
name eliminates confusion. |
| CREATE
THE REQUIRED ROLES |
- Log on as a user with the USERS/ROLES permission.
- Go to System > Manage People > Roles.
- Click the NEW button.
- Enter a name and optional description. You may also add a Role
ID; however, if you leave this field blank, the system will provide
one for you.
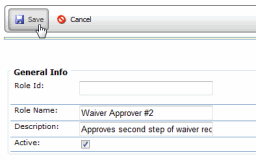
- Click the SAVE button.
- Click the PERMISSIONS tab.
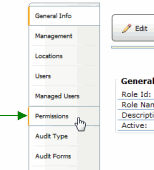
- Click the ADD button.
- Select the following permissions:
- WAIVER - APPROVE WAIVERS
- WAIVER - VIEW WAIVERS
- POLICY - VIEW POLICIES
- Click the SAVE button.
| ASSIGN
A USER TO EACH ROLE |
- On the Role profile page, click the USERS tab.
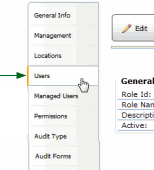
- Click the ADD button.
- Select the user you want assigned to this role.
- Click SAVE. The user is added to the role.
|
You'll need to ensure that the user also
has access to the appropriate management records and locations,
either through this role or through another role assignment. Most
likely the person responsible for waiving adherence to a standard
already has the necessary association to the management record
through another role assignment. |

ref:
Waivers