Audit Form Activation Schedule

 |
OPTIONAL FEATURE - Contact your
RizePoint representative to enable/disable this option. |
The Audit Form Activation option allows administrators to create an
activation schedule for a specified list of audit forms. The schedule
can be set up to activate all forms at once on a specified date, or to
activate only one form at a time; when one form becomes active, all others
are made inactive. Administrators can configure the schedule to automatically
activate and deactivate forms at specific times to eliminate the possibility
of auditors accidentally conducting audits on outdated forms.
For example, perhaps your organization uses a different form each month.
You can create multiple forms ahead of time, then create an activation
schedule that automatically activates a different form each month, and
deactivates all other forms listed in the schedule.
When this option is enabled, a new menu entry, AUDIT FORM ACTIVATION,
appears in the Audit > Audit Setup menu. In addition,
a new permission, FORM - ACTIVATION, becomes available in the permissions
list.
 |
This option requires custom setup by RizePoint
engineers. |
Once you've created the required audit forms, you can create and define
an activation schedule. This process requires the following steps:
CREATING
A NEW ACTIVATION SCHEDULE
- Log on as a user with FORM ACTIVATION SCHEDULING permission.
- On the left navigation bar, go to Audit > Audit Setup
> Form Activation Schedule. The Audit Form Activation
window opens.
- Click the NEW
 button. Editable
fields appear at the top of the list.

- Enter a name for the schedule.
- Enter an optional description.
- Click the SAVE
 button.
ADDING
FORMS TO THE SCHEDULE
- Click the Attributes DEFINE link.

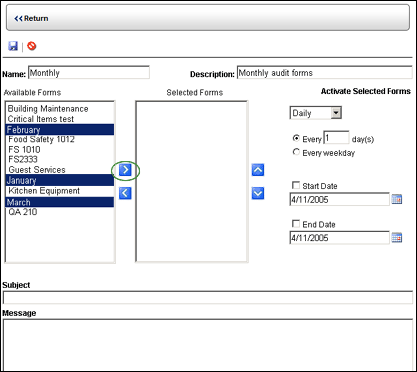
All available audit forms appear in the Available Forms list.
- Select the audit forms that you want to include in this schedule.
To add multiple audit forms at the same time, hold the Control key
down while selecting multiple forms.
 |
An audit form may not be added to multiple
activation schedules. Audit forms that have already been added
to another schedule do not appear in the list of available
forms. Likewise, any forms that you add to this schedule will
not be available for inclusion in other activation schedules.. |
- Click the blue right-arrow to move the forms to the Selected Forms
list. You may continue to add forms in this manner.
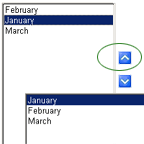
- The order in which a form appears determines the order in which
it will be made active, so a form's position in the Selected Forms
list is crucial. To re-order the list of Selected Forms, select the
form that you want to move, then click the UP or DOWN arrow on the
right to position the audit form in the desired order.
CONFIGURING
THE ACTIVATION SCHEDULE
Use the controls in the ACTIVATE SELECTED FORMS area on the right to
specify the time period in which to activate the specified forms. The
time interval entry you select from the first droplist determines which
fields are available.

 |
If the boxes
above the START and END DATE fields are not checked, the dates
specified in the START and END DATE fields are ignored, and the
schedule is activated immediately according to the parameters
specified in the area directly above the START and END DATE fields.
 |
- ONE TIME - When this option is selected, all forms in the schedule
are activated at the same time on the specified START DATE, and remain
active until the END DATE is reached. If no START and END DATES have
been specified (checkboxes remain unchecked), all forms become active
immediately. For example, perhaps your organization uses different
audit forms each year. All forms for a single year can be created
ahead of time, than added to a schedule. The first day of the year
can be designated as the START DATE, and the last day of the year
designated as the END DATE. All forms will become active on the first
day of the year and remain active until the last day of the year.
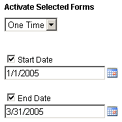
- Select ONE TIME from the time interval drop-down list.
- To specify the START and END DATES of this activation schedule,
check the boxes above the START and END DATE fields.
If these boxes are not checked, the dates specified in the START
and END DATE fields will be ignored, and the schedule will be
activated immediately and remain active until an END DATE has
been added to the schedule.
- Click the calendar button
 beside the START
DATE field. A calendar opens in a separate window.
- Click the date on which you want to activate the schedule.
If necessary, use the navigation controls at the top of the calendar
to navigate to other months or years.
- Click the SAVE button at the top of the calendar.
- Click the Calendar button beside the END DATE field.
- Click on the date on which you want the schedule to end.
- Click the SAVE
 button at the
top of the calendar.
- DAILY - When this option is selected, the first form in the list
becomes active for the number of days specified. Then the first form
is deactivated, and the second form becomes active for the number
of days specified, and so on. As long as the END DATE has not occurred,
it continues to cycles through the list. When all forms on the list
have been activated for the number of days specified, then the first
form is made active again, and the cycle continues until the end date
has been reached. If no START and END DATES exist (boxes remain unchecked),
then the process continues to cycle through the forms over and over
again.
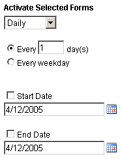
- Select DAILY from the time interval drop-down list.
- Select one of the following options:
- Select the number of days that you want each form to remain
active.
- Select to activate a new form every weekday (ignoring Saturdays
and Sundays).
- To specify the START and END DATES of the schedule, check the
boxes above the START and END DATE fields. (If these boxes are
not checked, the dates specified in these fields are ignored,
and the schedule will begin immediately and will cycle continuously.
- Click the calendar
 button beside the START DATE field. A calendar opens in a separate
window.
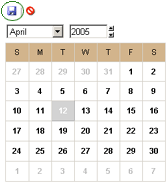
- Select a START DATE, then click the SAVE
 button at the top of the calendar. (If necessary, use the navigation
controls at the top of the calendar to navigate to other months
or years.)
- Click the calendar button beside the END DATE field.
- Select an END DATE, then click the SAVE button at the top of
the calendar.
- WEEKLY - When this option is selected, a new form is activated
on a weekly basis on the specified day(s) of the week. You may activate
a new form every week, every other week, every third week, etc., until
the END DATE is reached.
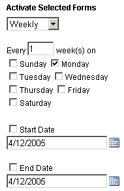
- Select WEEKLY from the time interval drop-down list.
- Select how often you want to activate new forms. (For example,
enter "1" to activate a new form on the specified day
of every week; enter "2" to activate a new form on the
specified day of every other week, etc.)
- Select the day(s) of the week on which you want a new form
activated.
For example, if you're activating the forms EVERY 1 WEEK and
you have both SUNDAY and TUESDAY selected, then the first form
would become active on the first Sunday after the START DATE,
then the next form would become active on Tuesday, and the next
form would become active the next Sunday, and so on.
If you're activated forms EVERY 2 WEEKS, the first form would
become active on the first Sunday after the START DATE, and the
next form would become active on Tuesday. Then one week would
be skipped, so the next form would become active one week from
the following Sunday, and so on.
- To specify the START and END DATES of the schedule, check the
boxes above the START and END DATE fields. (If these boxes are
not checked, the dates specified in these fields are ignored,
and the schedule will begin on the next day of the week specified
and will cycle continuously.
- Click the calendar
 button beside the START DATE field. A calendar opens in a separate
window.
- Select a START DATE, then click the SAVE
 button at the top of the calendar.
- Click the calendar button beside the END DATE field.
- Select an END DATE, then click the SAVE button at the top of
the calendar.
- MONTHLY - When this option is selected, you have the option of
activating a new form on a particular day of each month. You may specify
either an actually date or a specific day of the week. For example,
you may activate a new form on the 4th day of each of the selected
months, or you may activate a new form on the second Wednesday of
each of the selected months.
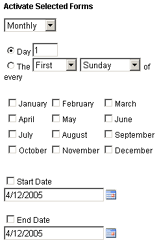
- Select MONTHLY from the time interval drop-down list.
- Select one of the following options:
- Select the day of the month on which to activate each new
form.
- Select a specific occurrence of a particular day of the
week, such as the second Monday of the month, the first Friday
of the month, etc.
- Select the month(s) during which you wish to activate a form.
For example, you may select to activate a new form on the first
day of January, February, and March only.
- To specify the START and END DATES of the schedule, check the
boxes above the START and END DATE fields. (If these boxes are
not checked, the dates specified in these fields are ignored,
and the schedule will begin on the day specified and will cycle
continuously.)
- Click the calendar
 button beside the START DATE field. A calendar opens in a separate
window.
- Select a START DATE, then click the SAVE
 button at the top of the calendar.
- Click the calendar button beside the END DATE field.
- Select an END DATE, then click the SAVE button at the top of
the calendar.
SETTING
UP EMAIL NOTIFICATION
You have the option of sending email to all users associated with a
form immediately upon its activation. (This feature requires custom setup
by RizePoint.)
- Enter the text that you want to appear in the subject line of the
email.
- Enter the message that you want sent to all users associated with
the currently active audit form.
SAVING
THE SCHEDULE
After all audit forms have been added and all parameters have been specified,
click the SAVE  button in the upper left section of
the window to save this activation schedule.

ASSOCIATING
USERS AND ROLES WITH THE SCHEDULE
Users must be associated with a schedule, either directly or through
a role association, in order to have access to the schedule. In addition,
the user must also have the FORM ACTIVATION SCHEDULING permission. Without
this permission, the AUDIT FORM ACTIVATION menu entry will not be available
and therefore users will not be able to access any schedules.
Typically, only administrative users are associated with an activation
schedule. These users will be able to edit any schedules to which they
have been associated. When editing schedules, users should keep in mind
that only forms to which they have been given access will appear in the
AVAILABLE FORMS list.
To provide access through a role
association:
- Click the EDIT link in the Roles column. All available roles appear
in a list.

- Select the roles that you want to have access to this schedule.
- Click the SAVE
 button.
To give direct access to individual
users:
- Click the EDIT link the Users column. All available users appear
in a list.

- Select the users that you want to have access to this schedule.
- Click the SAVE
 button.
Viewing selected Users and Roles:
Both the Users and Roles pages provide a VIEW SELECTED  button on the button toolbar.
Clicking this button displays only the currently selected users or roles.
This is especially useful when your Users list is extensive. It eliminates
the necessity to scroll through page after page of users to determine
which users are currently selected.
Click the VIEW SELECTED  button
again to display the entire list. This button acts as a toggle. Click
once to display only the selected items; click again to display the entire
list.

ref:FormActivation
(custom setup required)


![]() button in the upper left section of
the window to save this activation schedule.
button in the upper left section of
the window to save this activation schedule.


![]() button on the button toolbar.
Clicking this button displays only the currently selected users or roles.
This is especially useful when your Users list is extensive. It eliminates
the necessity to scroll through page after page of users to determine
which users are currently selected.
button on the button toolbar.
Clicking this button displays only the currently selected users or roles.
This is especially useful when your Users list is extensive. It eliminates
the necessity to scroll through page after page of users to determine
which users are currently selected.![]() button
again to display the entire list. This button acts as a toggle. Click
once to display only the selected items; click again to display the entire
list.
button
again to display the entire list. This button acts as a toggle. Click
once to display only the selected items; click again to display the entire
list.