Audit Form Import/Export Tool

 |
OPTIONAL
FEATURE - Contact your RizePoint representative to enable/disable
this option. |
This AUDIT FORM IMPORT/EXPORT tool allows you to import and export audit
forms and policy files. This option also provides an incremental update
feature that allows you to export specific questions from one or more
audit forms, make changes to those questions, and then import them back
into one or more audit forms.
When this option is enabled, an AUDIT FORM entry appears in the System
> Import/Export submenu. An Activity Log is also provided
that allows you to see the results of the import/export function.
Some of the functions provided by the Audit Form Import/Export:
- Create a new form from an existing form, then modify it in Excel,
and import back into the application
- Copy policy files from one form to another
- Update an existing form
- Export questions in a form, modify them, then import those questions
into one or more forms
The following limitations apply:
- A maximum of five answer choices can be exported/imported per question.
- Spinner, Temperature, Bar Code, and Combo Box question types are
not supported. Any questions of these types are converted to radio
questions when exported, and any answer choices associated with these
questions are lost.
- If the same Category ID has been assigned to multiple categories,
all questions from all categories with the same category ID appear
together in the first category assigned to that ID. (All categories
will still appear in the exported form, but all questions associated
with a single category ID are all placed together in the first occurrence
of the category ID, and other categories with the same ID will be
empty.)
- If the default audit form configuration option RE-AUDIT TYPE is
set to MANUAL, triggered questions will not import. This is because
Manual Re-Audit Type does not support Dynamic Question functionality
(triggered questions).
- If the same question is triggered by more than one answer choice,
the question will only be marked as triggered by the first answer
choice that triggers it.
- When using the Incremental Update feature, questions are updated
based on the unique Question ID associated with a question. The category
(identified by its category ID) to which a question is being imported
must already exist in the form to which the data is being imported.
If the Category ID does not exist, the question cannot be imported.)
- When updating questions, note that forms with audit results uploaded
against them will not be updated. However, questions on those forms
may be exported.
To import/export audit forms:
- Go to System > Import / Export > Audit Forms.
- Select AUDIT FORMS / POLICY FILES.
A list of all audit forms is displayed.
The following buttons are added to the standard tool bar:
 |
Export Form |
 |
Import Form |
 |
Export Policy Files |
 |
Import Policy Files |
 |
Incremental Export |
 |
Incremental Import |
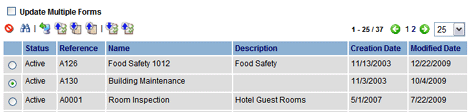
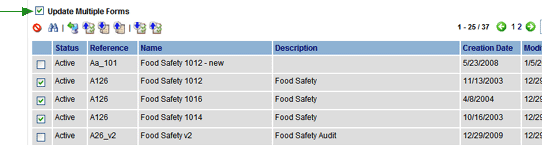
In addition, an UPDATE MULTIPLE FORMS checkbox is available that allows
you to update multiple forms with policy files and specified questions.
When this checkbox is enabled, the radio buttons are replaced with checkboxes,
allowing you to select multiple forms.
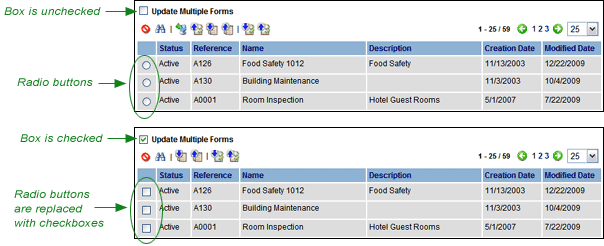
Please note, however, that only one audit form can be exported or imported
at a time. If you click the UPDATE MULTIPLE FORMS checkbox, both the EXPORT
FORM and IMPORT FORM buttons become disabled.
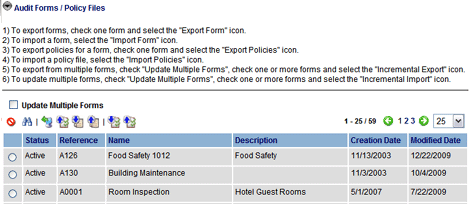
AUDIT FORMS
Audit forms are exported and imported one at a time. Keep in mind that
a maximum of five answer choices can be exported/imported per question.
Radio, Droplist, Text, Date, and Time question types are supported.
To
export an audit form:
- Click the radio button beside the form you want to export.
- Click the EXPORT FORM
button.
- In the File Download dialog, click SAVE, then navigate to the location
where you want to save this file, and click SAVE.
The file is saved to the specified location. You may then open the file
in Excel and make any necessary changes.
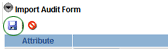
To
import an audit form:
- Click the IMPORT FORM
button. The Import Audit Form page opens.
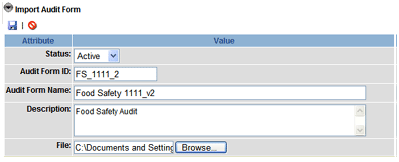
- Verify that the correct status appears in the STATUS droplist.
If not, change the status.
- Enter an Audit Form ID for the new form.
- Enter a name for the new form.
- Enter a description (optional).
- Click the BROWSE button and locate the file, then click OPEN.
- Click the SAVE button.
- A dialog opens that asks you to verify that you want to import
the form. Select OK.
The form imports and the Activity Log opens to confirm the import process
was successful.
POLICY FILES
You may import and export policy files to or from one or more forms.
It is important to note that when exporting, a policy file is created
for each question that contains a policy, based on the Question ID. If
multiple questions that contain policy files have the same Question ID
assigned to them, only one policy file is created. When imported, all
selected forms will be updated with the files in the uploaded zip file,
matching the policy files with the Question ID. If the selected forms
contain questions with duplicate Question IDs, those questions will all
be assigned the same policy file.
To
export policy files:
- Click the button beside the form that contains the policy files
you want to export. Note that you may export policy files from more
than one form by checking the UPDATE MULTIPLE FORMS box. When this
box is checked, the radio buttons become checkboxes, allowing you
to select multiple forms from which to export policy files.
- Click the EXPORT POLICY
button.
- Click SAVE in the File Download dialog.
- Navigate to the location where you want to save the exported policy
files, and click SAVE.
An HTML policy file is created for each question that contains a policy
(based on the Question ID, and then placed in a folder and zipped. You
can unzip the files and edit them as necessary. Be sure to zip them up
again before importing.
To
import a policy file:
- Click the button beside the form you to which you want to import
policy files. Note that the questions in the form you select here
must be assigned the same question IDs as the question IDs associated
with the policy files. Otherwise, the import process will fail.
- Click the IMPORT POLICY
button.
- Click the BROWSE button and locate the zipped html
files, then click OPEN.
- Click the SAVE button.
- A dialog asks you to confirm that you want to import the policy
files. Click OK. The Activity Log opens to confirm the policy files
were imported successfully.
- The selected forms are updated with the files in the uploaded zip
file, matching the policy file’s name to the question’s Question ID.
UPDATING QUESTIONS
The incremental update feature allows you to export selected questions
from one or more forms to an Excel spreadsheet, make changes to those
questions, and then import the questions back into one or more forms.
Forms, on which audits have already been conducted and uploaded, will
not be updated. You may, however, export questions from those forms.
For example, perhaps you want to use a form from the previous year,
but need to update the wording of some of the questions. You could first
copy the existing form to create a new form for the current year. Then
you could export the questions that need to be reworded, change the wording
of the questions, and then import those questions into the new form.
To
export questions:
- Go to System > Import\Export
> Audit Forms.
- Select AUDIT FORMS/POLICY FILES. A list of forms is displayed.
- Select the forms from which to export the questions.

To select multiple forms, check the UPDATE MULTIPLE FORMS checkbox,
which allows you to select more than one form.
- Click the INCREMENTAL EXPORT button.
- In the Question Reference(s)
field, enter the Question IDs of the questions you want to export.
Separate multiple Question IDs with a comma. You may use the asterisk
character (*) as a wildcard. If this field is left blank, all questions
will be exported.

- Click the SAVE button
 in the upper left corner. A message appears to confirm that you want
to export the questions. Click OK to continue.
in the upper left corner. A message appears to confirm that you want
to export the questions. Click OK to continue.
- When the export completes, click the SAVE button, then navigate
to the location where you want to save the file, and click SAVE.
You may then open the file in Excel and edit the questions as desired.
To
import questions:
- Go to System > Import\Export
> Audit Forms.
- Select AUDIT FORMS/POLICY FILES.
- Select the form(s) to which to import
the questions. If you want to import the questions into more than
one form, click the UPDATE MULTIPLE FORMS checkbox.
- Click the INCREMENTAL IMPORT button.
- If any of these questions (as determined by the Question ID) do
not already exist, you can specify whether or not to create the question
or not. Note, though, that the category ID associated with the question
must already exist in this form; otherwise, the question will not
import.
In the CREATE QUESTIONS field, select either YES or NO.
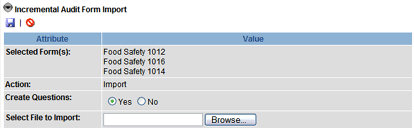
- Click the BROWSE button and locate the Excel file that contains
the questions you want to import.
- Click the SAVE button. The file exports, and the Activity Log opens.
ACTIVITY LOG
A log is maintained of all import/export activities. The information
contained in the log includes the date and time of the activity, the user
name of the person importing or exporting data, the results of the operation,
and the form affected.
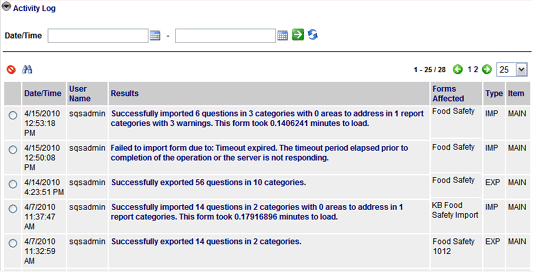
When working with multiple forms, the form names are noted in the RESULTS
column. When working with only a single form, the form name appears in
the FORMS AFFECTED column.
To access the log:
- Go to System > Import\Export
> Audit Forms.
- Select ACTIVITY LOG.
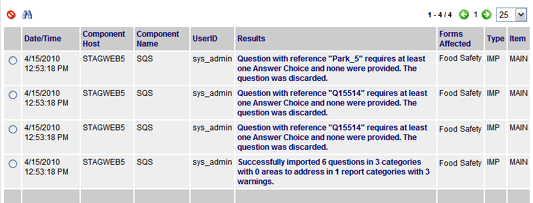
- To view the details of any of the results, click on the link in
the Results column.
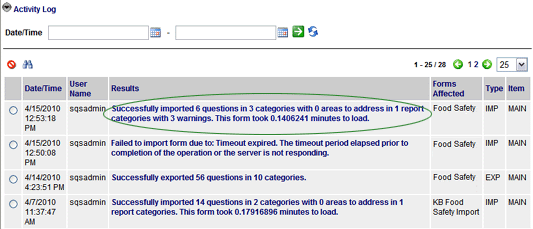
The details of the activity are displayed.
To
search for activity within a specified date range:
- Click the CALENDAR button in the first date field to display a
calendar.
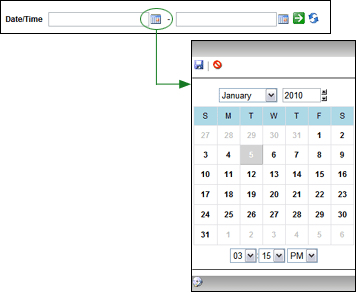
- Click on the beginning date. Note that you may also specify a time
in the fields located at the bottom of the calendar window.
- Click the SAVE button
in the upper left corner to save the date and close the calendar window.
- Click the CALENDAR button in the last date field to select the
ending date on which to search.

- Select the ending date and time from the calendar, then click the
SAVE button in the upper left corner of the calendar.
- Click the GO
 button to search
for all activity that occurred between the starting and end dates
specified.
button to search
for all activity that occurred between the starting and end dates
specified.
- All activity that occurred between the starting and ending dates
specified is displayed.
 |
To clear the dates in both of the Date fields,
click the CLEAR  button
on the right. button
on the right. |
