Custom Contact List

 |
CONFIGURABLE FEATURE - This feature
requires special configuration to be functional within the software.
If you have additional questions not covered in the instructions
below, please contact RizePoint Customer Service. |
This option is
available for 360 Mobile Auditor and Mobile
Auditor PC only.
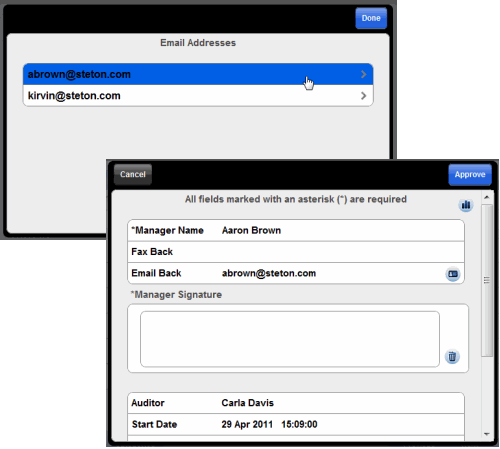
When this option is enabled, auditors can predefine one or more email
addresses that will be available to add to the EMAIL BACK field in the
Signature screen in Mobile Auditor. (The email address specified in the
EMAIL BACK field of the Signature screen is the email address to which
email is sent when the "Audit Result" Recipient Type is specified
in an automated feedback rule.) The auditor can then select one or more
addresses from the list, eliminating the need to manually type the email
address in. This list of predefined email addresses is stored on the local
device and will be available for all audits conducted on this device,
as long as the option is enabled.
 |
Due
to the manner in which data is stored in 360 Mobile Auditor, custom
email lists created in MAPC will be lost when upgrading to 360
Mobile Auditor. Before upgrading, be sure to make a copy of the
email addresses so they can be re-entered later. |
To verify the configuration file assigned to the user:
- Log on as a user with administrative permission.
- Go to System > Manage People > Users.
- Select the user from the list.
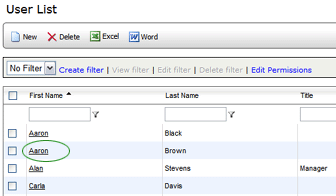
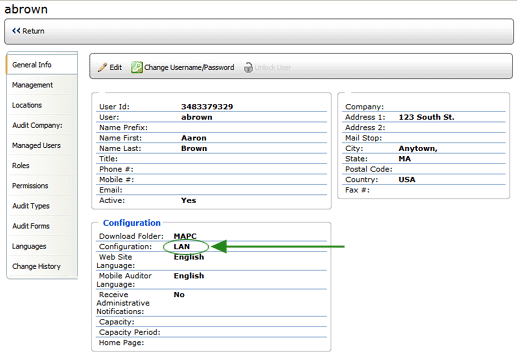
- At the bottom of the window, look at the CONFIGURATION assigned
to this user.
To enable the application configuration
option:
- Go to System > System Setup > Mobile Auditor Configuration.
- Select the configuration of the Mobile Auditor users who will be
creating custom email lists, or create a new configuration.
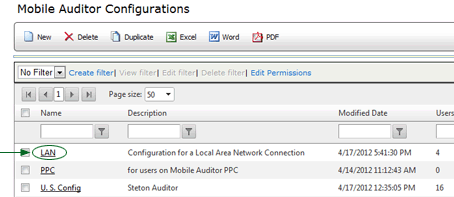
- On the CONFIGURATIONS tab, locate the 360 MOBILE AUDITOR: CUSTOM
EMAILS configuration option.
- Click the EDIT pencil beside the option.

- Check the box on the right.

- Click the UPDATE button.
 |
If you created a new Mobile Auditor
configuration, remember to go back to the appropriate User profile
pages in System > Manage People > Users
and assign this configuration to all users who will be using this
feature. |
To add email addresses to the list:
- Click the EMAIL LIST button at the top of the audit window. The
Email List dialog window opens.

- Click in the NEW field at the top, enter an email address, then
click the SAVE button.

The address is added to the list.

- You may continue to add as many addresses as you want. Just click
in the NEW field to add the next address.
- When you're finished adding email addresses, click the DONE button
in the upper right corner.

To delete an email address:
- Click the DELETE button (trash can icon) to the left of the address
that you want to delete.

- The address is removed from the list.
To edit an email address:
- Click on the email address that you want to edit. The field becomes
editable.

- Edit the text as necessary, then click outside the field. The change
is automatically saved when you click outside the field.
To select an EMAIL BACK address in
the Signature screen:
- In the Signature screen, click the EMAIL LIST button on the right
of the Email Back field. The list of predefined email addresses is
displayed.
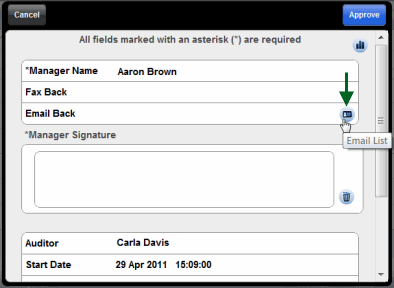
- Click on an email address to select it. The Email list closes and
the selected email address appears in the EMAIL BACK field. Note you
may add multiple email addresses to the Email Back field; just click
the EMAIL LIST button again to add another email address.
To add email addresses to the list:
- Click the EMAIL
LIST button at the top of the audit
window, or select EMAIL LIST from the View menu. The Email List dialog
window opens.
- In the entry field at the top, enter an email address, then click
the ADD
button.
The address is added to the list.
Notice the checkbox
beside it. If you want to edit or delete this address, check the box,
then click the EDIT or DELETE button.
- You may continue to add as many addresses as you want. All addresses
you enter here are saved to your PC and will be available in the EMAIL
BACK list in the Signature window of all audits conducted on this
same PC.
- When you're finished adding email addresses, click the CLOSE button.
To delete an email address:
- Click the box beside the address that you want to delete to select
it.
- Click the DELETE button.
To edit an email address:
- Check
the box beside the address that
you want to edit. The selected address appears in the text field at
the top.
- Edit
the text as necessary, then click
the EDIT button. The entry is edited.
Note that if you click the ADD button
instead of the EDIT button, the edited entry is added to the list, and
the original (selected) address remains.
To select an EMAIL BACK address
in the Signature screen:
- In the Signature screen, click
the EMAIL
LIST button on the right of the
Email Back field. The list of predefined email addresses is displayed.
- Check the box beside an email
address to select it, then click the INSERT button. The selected email
address appears in the EMAIL BACK field. (Note that you may select
more than one address. )


