OPTIONAL FEATURE - Contact your RizePoint representative to enable/disable this option. |
When the SCHEDULE DOWNLOAD TO Mobile Auditor option is enabled, a DOWNLOAD SCHEDULE ITEM TO MOBILE AUDITOR checkbox is added at the top of the Schedule Item window. When this box is checked, the schedule item automatically downloads to the Mobile Auditor device when a connection to the server is made, and when the audit results are uploaded to the server, the scheduled audit is marked as complete and removed from the schedule.
| APPLICATION SETUP |
Verify the configuration file assigned to the users who will be downloading schedules to Mobile Auditor:
Log on as a user with administrative permissions.
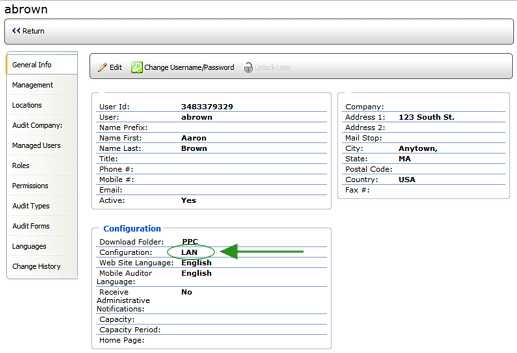
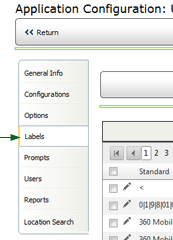
To enable the configuration option:
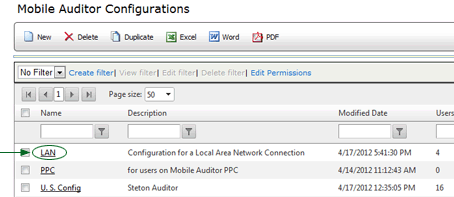


| If you created a new application configuration, remember to go back to the appropriate User profile pages and assign this configuration to all users who will be using this feature. |
| SCHEDULE SETUP |
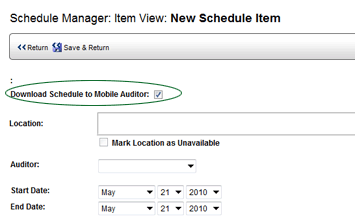
| Select the DOWNLOAD SCHEDULE TO MOBILE AUDITOR option on new schedule items only. Enabling this option on existing audits may be problematic and should be avoided. |
| MOBILE AUDITOR PPC |
Depending on how Mobile Auditor has been configured, the Scheduled Audits screen may be accessed in one of the following ways:
--OR--
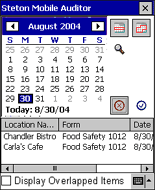
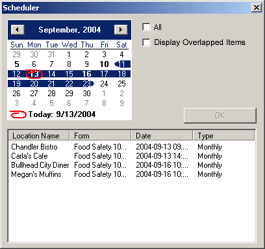
The Scheduled Audits screen displays a calendar, with the current date selected. A list of all audits scheduled to begin on the selected date is displayed at the bottom of the screen. Note that all dates on which audits are scheduled are displayed in bold type.
You may select a different date by tapping on the date with the stylus pen. Remember, only audits scheduled to begin on the selected date appear in the list.
You may select multiple days:
The list displays only those audits scheduled to BEGIN on the selected date (or dates). However, sometimes an audit is scheduled to be completed at any time WITHIN a specified range of dates.
If the DISPLAY OVERLAPPED ITEMS checkbox at the bottom of the screen is selected and the selected date (or dates) falls any time within the specified START and END dates of a scheduled audit, that audit is included in the list at the bottom of the screen.
For example, let's say the selected (current) date is August 12 and an audit has been assigned a START DATE of August 10 and an END DATE of August 15. This audit will not appear in the list because it is not scheduled to begin on August 12. However, if the DISPLAY OVERLAPPED ITEMS box is selected, the audit will be included in the list, because August 12 falls within the scheduled START DATE (August 10) and END DATE (August 15).
NOTE: If your organization typically specifies a range of dates during which time an audit is to be conducted, be sure that this checkbox is selected.
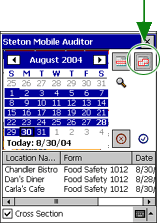
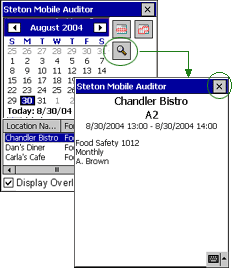
To display details of an audit in the list, tap the audit once to select it, then tap the FIND button. The details of the audit are displayed. Tap the CLOSE button (X) at the top of the screen to close the window and return to the Scheduled Audits screen. (Note: The FIND button is only available when an audit is selected.)
| mobileAUDITOR PC |
Depending on how Mobile Auditor has been configured, the Scheduled Audits screen may be accessed in one of the following ways:
--OR--
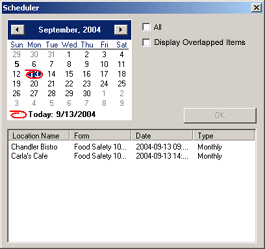
The Scheduled Audits screen displays a calendar, with the current date selected. A list of all audits scheduled to begin on the selected date is displayed at the bottom of the screen. Note that all dates on the calendar on which audits are scheduled are displayed in bold type.
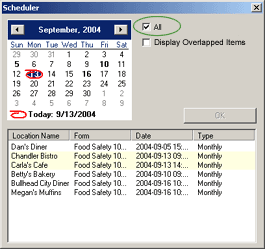
If the ALL checkbox is selected, all audits currently in the schedule are displayed, with the audits scheduled for the selected date (by default, the current date) highlighted.
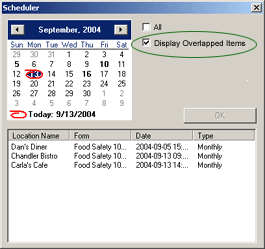
If the DISPLAY OVERLAPPED ITEMS checkbox is selected and the selected date (or dates) falls any time within the specified START and END dates of a scheduled audit, that audit is included in the list at the bottom of the screen.
For example, let's say the selected (current) date is August 12 and an audit has been assigned a START DATE of August 10 and an END DATE of August 15. This audit will not appear in the list because it is not scheduled to begin on August 12. However, if the DISPLAY OVERLAPPED ITEMS box is selected, the audit will be included in the list, because August 12 falls within the scheduled START DATE (August 10) and END DATE (August 15).
NOTE: If your organization typically specifies a range of dates during which time an audit is to be conducted, be sure that this checkbox is selected.
You may select multiple days. Click and drag the cursor to highlight the days you want to display.

ref: scheddcomp