
When you have OLAP capability, report filters become available while in
View mode. This allows you to instantaneously filter the data that is
displayed without the necessity of editing and re-executing the report.
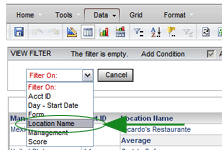
The View Filter allows you to specify one or more conditions that return a subset of the data in the original report. For example, if the original report has all locations in the Southwestern region shown, you could choose to show Phoenix locations only by adding a condition to the View Filter.
| If the report is in View mode, you can display and change the View Filter. If the report is in Design mode, you can display but not change the View Filter. |
To display the View Filter on a report:
From the Data menu drop-down list, select ADD VIEW FILTER CONDITION.
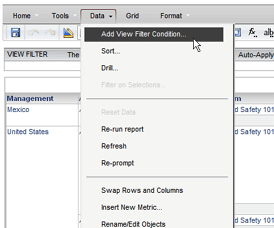
-- OR --
Click the VIEW FILTER button ![]() on the toolbar.
on the toolbar.
| The View Filter can be accessed from either the Tools tab or the Data tab. |
ADDING A CONDITION TO THE VIEW FILTER
NOTE: You can change the View Filter only if the report is in View Mode.

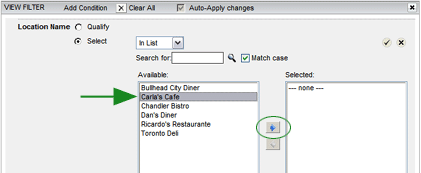
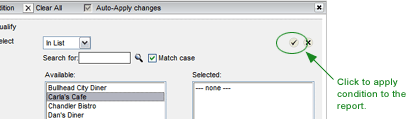
If you want to make multiple filter changes and apply them all to the report at once, clear the Auto-Apply changes option. You must still confirm each condition, but then click the APPLY button to have all of the changes apply to the report.
REMOVING COLUMNS FROM THE GRID
You can right-click on a column heading and select the REMOVE COLUMN FROM GRID option to remove a column from the grid. This action does not remove the column from the report; the data remains intact. It merely removes, or hides, the column from the view. This option is only available to users with OLAP functionality.
| Avoid removing a column that is required to calculate a metric. In this case, dashes (---) will appear in the column containing the calculated data. |
