Visual Thresholds (L2)

Visual thresholds are thresholds defined for a metric, which are based
on that same metric or on another metric. Visual thresholds use range
expressions (such as greater than, less than, between, top, bottom). Visual
thresholds consist of one expression, for example, a visual threshold
can calculate a score that is greater than 125 and apply special formatting
to the values that match the condition, or can replace the values with
images or symbols.
You can define your own visual thresholds with custom formatting for
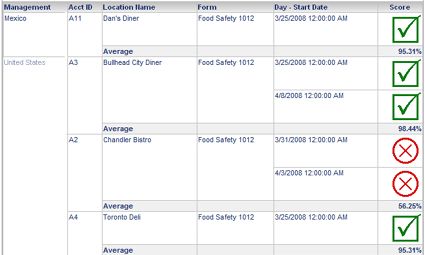
a report. For example, if you want the top 5% of audit scores formatted
with blue, Arial font, you can define a threshold for that range of values
and with that formatting. On the same report, you can have all scores
below 50% be replaced by an image of an arrow pointing down.
To
define and format a visual threshold:
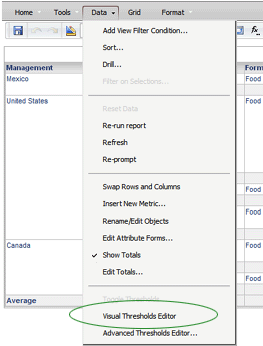
- Run a report.
- From the Data menu, select VISUAL THRESHOLD EDITOR, or click the
VISUAL THRESHOLD EDITOR button
 on the toolbar.
The Visual Threshold Editor opens.
on the toolbar.
The Visual Threshold Editor opens.
- In the THRESHOLDS FOR drop-down list, select the metric on which
to create the threshold. The list includes all the metrics defined
for the report.
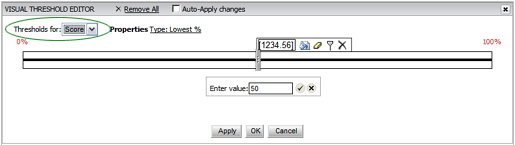
- Click the Properties TYPE link to reveal the TYPE and BASED ON
droplists.
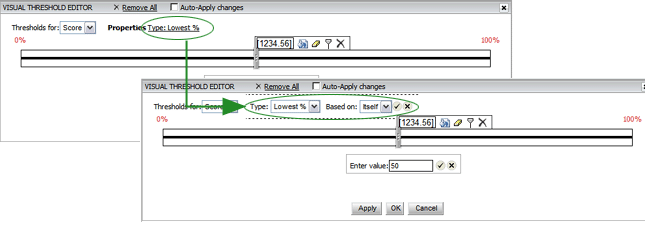
- From the TYPE droplist, select the type of condition to use for
the threshold. For example, if you want to define Scores greater than
125, select VALUE from the drop-down list. This ensures that the threshold
is based on an actual value, in this case, 125. If you want to define
a threshold for the Lowest 20% of scores, then select LOWEST % instead.
- From the BASED ON drop-down list, select whether the threshold
condition is based on the metric ITSELF or on another metric on the
report.
- Click the APPLY icon to close the Qualification pane.

- Enter the desired value in the entry box, then click the OK button.
(Note that you may instead drag the slider bar to the desired location.)
- To display the formatting bar, click on the section of the slider
that you want to format.

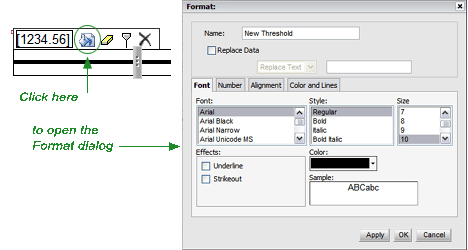
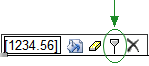
- Click the FORMAT icon to open the Format dialog, which allows you
to format the threshold. (Note that you may, instead, just double-click
on the section that you want to format.)
- Format the threshold as desired, then click the OK button to close
the dialog.
- To add a new threshold value, click in the section where you want
to add a threshold, then click the ADD THRESHOLD icon on the formatting
bar. A slider is added to the threshold bar. The slider's initial
location differs depending on the type of condition you specified
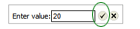
above. You can click on the slider and add a new value in the Enter
Value field, or you can move the slider to a new value.
- Add additional sliders as necessary. For example, if you want a
threshold to display green font for all audit results scoring in the
top 20%, and red font for all scores in the bottom 20%, you must have
two sliders on the threshold bar, one representing scores greater
than 80% and another representing scores below 20%. Click the APPLY
button to apply changes to the report, without closing the Threshold
Editor, or click OK to apply the changes and close the Threshold Editor.
Note that you may also check the APPLY AUTO CHANGES box to apply changes
to the report immediately.

- To delete all of the sliders from the bar, click REMOVE ALL link
at the top of the Visual Threshold Editor.

To
specify the formatting for the threshold:
- To format a specific threshold condition, double-click the threshold
slider to format. The Format dialog box opens.
-- OR --
To format a threshold range (the area between two sliders), double-click
anywhere in the space between the two sliders that you want to format.
The Format dialog box opens.
- Type a name for the threshold in the NAME field.
To replace the threshold values with text, an image, or a quick
symbol, select the REPLACE DATA check box and select one of the following
from the drop-down list.
- REPLACE TEXT: Select this option to display your own text.
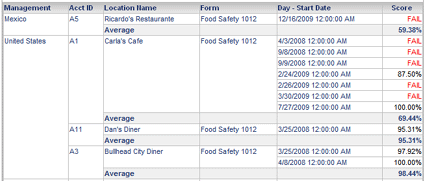
This replaces the values that meet your threshold condition with
text. Then type the text in the empty text field. The text should
be limited to 255 characters. For example, if the audit score
is less than 60%, you might display the word FAIL in red.
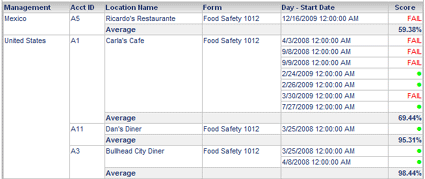
- QUICK SYMBOL: Select this option to replace the values
that meet your threshold condition with a symbol. Then select
a symbol from the drop-down list. For example, in a report showing
audit scores, you can display a green dot to represent passing
scores.
- IMAGE: Select this option to replace the values that
meet your threshold condition with an image file. Specify the
path to where the image is stored. The image should be stored
in the Web Services folder. See Using Images,
below, or contact your RizePoint representative for assistance.
- Select one of the following tabs to access the formatting options
for your report.
- FONT: Change the font and color of letters and numbers in the
report, and change the background by applying gradients and other
effects. To change cell background (fill) color, use the Fill
Color option on the Color and Lines tab.
- NUMBER: Specify a number format for values. For example, you
can ensure that certain metric values are displayed as percentages.
- ALIGNMENT: Specify how values and text are aligned within cells
on the grid report.
- COLOR AND LINES: Change the formatting of lines in your grid
report, such as cell borders. To format cell borders, use the
Borders options on the Color and Lines tab.
- Click APPLY to apply the changes to the threshold, or click OK
to apply the changes and close the editor.
*
USING IMAGES
You can use any image from your Logo
Manager. Follow the instructions below to determine the URL to the image.
If you have difficulty, contact your RizePoint representative for assistance.
- Go to Mobile Manager >
Logos.
- Right-click on the image you want to use, and select PROPERTIES
from the right-click menu.
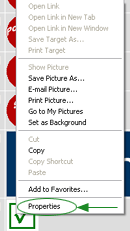
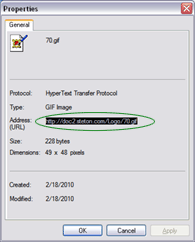
- Highlight the Address (URL), and copy it (CTRL-C),
then close the Properties dialog.
- Go back to the Visual Threshold
Editor and open the Format dialog where you want to include an image.
(Hint: Use your History List to quickly get back to your report.)
- Make sure the REPLACE DATA box is checked, and that IMAGE is
selected in the droplist.
- Paste the URL into the field on
the right of the droplist.
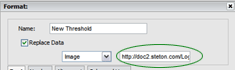
- Click OK to close the Format dialog.
- Click APPLY to view the image in
the report.
