Defining Workflow

 |
OPTIONAL FEATURE - Contact your
RizePoint representative to enable/disable this option. |
Once a waiver is requested, it is placed in a queue, and the user assigned
to the role associated with that queue receives email notification that
a waiver is waiting for approval. Once approved, the next user is notified,
and so on. The workflow you configure determines how a waiver moves from
person to person (or from queue to queue) for approval.
There are three different types of workflow available:
- AUTOMATIC: The system
first checks to determine if a pre-queue exists, and if so, places
the waiver in this queue. Once approved, the system checks for the
roles assigned to the standard. The waiver is placed in the queue
assigned to the first role assigned to the standard, then to the queue
associated with the second role assigned to the standard, and so on,
until the last role has approved the waiver. Finally, the system checks
to see if a post-queue has been defined, and if so, moves the waiver
to that queue. The automatic workflow ignores the Steps, if defined,
and instead goes strictly by the roles assigned to the standard, and
in the order in which they were added.
- MANUAL: The system
first checks to determine if a pre-queue exists, and if so, places
the waiver in this queue. Once approved, the system looks at the Steps
associated with the workflow, and moves the waiver to the first queue
specified (that is, to the user assigned to the role associated with
the first queue), then to the second selection, then the third selection,
and so on. Once all have been approved, the system checks to see if
a post-queue has been specified, and if so, moves the waiver to that
queue.
- AD HOC: The system
places the waiver in the Pre-Queue. All steps, if defined, are ignored.
The user assigned to the role associated with the Pre-Queue has two
options: (1) APPROVE OVERALL, which ends the approval process, or
(2) APPROVE & FORWARD, which allows the user to specify to whom
the waiver goes next. Once APPROVE OVERALL has been selected, the
system checks to see if a Post-Queue has been defined, and if so,
places the waiver in that queue for final approval.
- Log on as a user with WAIVER - WORKFLOW ADMINISTRATION permission.
- Go to System > Policies & Waivers > Configure
Waiver Workflows.
- Click the NEW button.
- In the WORKFLOW INFO section of the page, enter a name for this
workflow.
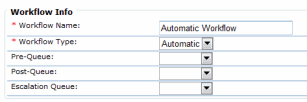
- From the WORKFLOW TYPE droplist, select the type of workflow you
want to create.
- If you want someone to look at the waiver before it goes to the
user associated with the first queue, select the Pre-Queue role from
the droplist. Note that this field is required if you're using the
AD HOC workflow type. If you're using the MANUAL workflow type, a
pre-queue is optional. If you're using the AUTOMATIC workflow type,
the pre-queue field is ignored.
- If you want someone to look at the waiver after it completes the
approval process, select the Post-Queue role from the droplist. If
you're using the AUTOMATIC workflow type, the post-queue field is
ignored.
- Select an Escalation Queue if you want the waiver intercepted in
the event it remains in the approval process longer than the specified
time.
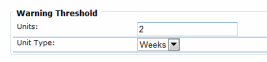
- The WARNING THRESHOLD fields determine the amount of time to wait
before a warning email is sent to remind the user currently responsible
for approval that the overall time allotted for approving the waiver
is about to expire. In the UNITS field, enter the number of days or
weeks to wait, then select DAYS or WEEKS from the UNIT TYPE droplist.
Note that this field applies to the overall approval process.*
- The ESCALATION THRESHOLD fields are used to specify the amount
of time to wait before the waiver is removed from this queue and placed
in the Escalation Queue. In the Escalation Threshold UNITS field,
enter the maximum number of days or weeks to wait, then select DAYS
or WEEKS from the UNIT TYPE droplist. If no escalation role was selected
from the ESCALATION QUEUE droplist above, the ESCALATION THRESHOLD
field is ignored. Note that this field refers to the overall time
allotted for approving the waiver.*

The user assigned to the role associated with the Escalation Queue
is then sent notification, and that user can then approve or deny
it. Note that once a waiver is intercepted in this manner, the user
associated with this queue has the responsibility for final approval.
- Click the SAVE button.
 |
You may specify a separate WARNING THRESHOLD
and ESCALATION THRESHOLD for each queue, or step of approval,
as well. However, the fields above apply to the overall approval
process (workflow) and not to the individual steps of approval. |
MANUAL WORKFLOW TYPE
If you selected the Manual workflow type, you'll need to define the
steps to determine the order in which the waiver moves through the approval
process.
- Click the STEPS tab.
- Click the ADD button.
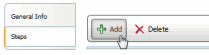
- Select the queue for this step, and click the SAVE button.
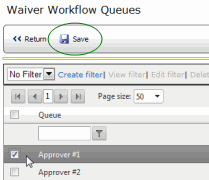
- Continue to add steps in this manner, in the order in which you
want the approval process to progress.
Once a post-queue has approved or denied a waiver, the workflow ends,
so make sure you don't select a post-queue as an intermediate step.

ref:
Waivers