Editing the Contents of the Sign In Screen

Changing the Logo
You can replace the RizePoint logo that currently appears in the header
on the Sign In screen with your own custom logo. Follow these logo guidelines
when uploading your own corporate logos:
- Logos should be no more than 72
pixels high by 200 pixels wide. See Logo
Configuration.
- We recommend using a vector-based PNG file to enable scaling without
loss of resolution. However, the RizePoint application also supports
uploads of JPEG and GIF formats.
To change the default logo:
- Log on as a user with LOGO ADMINISTRATION permission.
- Go to System > System Setup > Logo Configuration.
- Click the NEW button
 .
.
- Enter a name for this logo, then click the BROWSE button and locate
the image. You may add a JPEG, GIF file, but we recommend a PNG in
a vector format.

- Select YES from the Default drop-down list.
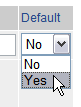
The default logo appears
in the header before a user signs on. Once a user signs on, the logo
associated with the user's management record is displayed instead.
If no other logo has been assigned to the user's management record,
the default logo remains in the header area of the screen. (To change
the logo associated with a user's management record, see Logos.)
 |
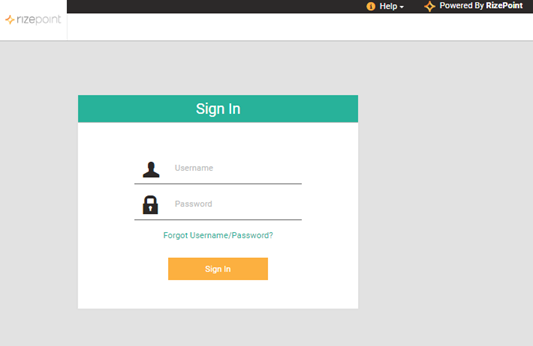
If no logo
has been designated as DEFAULT, the RizePoint logo appears in
the header on the sign on screen. If no logo has been assigned
to a user's management record, the RizePoint logo remains in the
header after signing on, as well. |
- Click the SAVE button
 .
The image is added to the Logo library.
.
The image is added to the Logo library.
This logo now appears in the left corner of the header in the sign
on screen.
Changing the Sign In Screen Text
You can replace the current welcome message with a welcome message of
your own. For example, you may want to provide special instructions or
guidelines to users before they sign in.
To change the Sign In screen text:
- Sign in as a user with CONTENT EDITOR permission.
- Go to Editor > Page Content.
- Click the EDIT LOG ON PAGE ITEMS button.

The Sign In window displays again, but this time it will have a Content
Editor disc at the bottom left of the Sign In box.
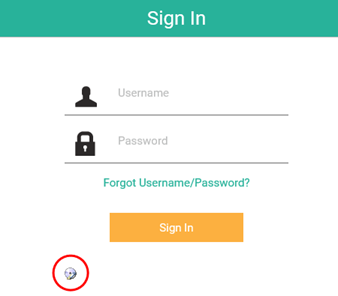
- Click the CONTENT EDITOR disc.
Another Content Editor window opens. This window contains all of the
page items that appear on the Sign On page, irrespective of the frame
in which the item appears.
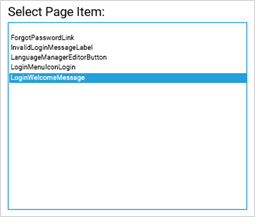
- Select the Login Welcome Message page item to edit the text that
appears in the content frame before a user signs on.
- Enter the text that you want to appear in the content pane of the
sign on screen in either the GLOBAL LABEL field or the LOCAL LABEL
field.
Because this page item appears only on the sign on screen, it doesn't
matter whether you edit the content globally or locally.

- Click the SAVE button at the top of the
column where you entered the text.
If you close the dialog or select another page item before clicking
the SAVE button, any changes will be lost.
- Click the CLOSE button.
- Sign Out of RizePoint.
The new text now appears on the Sign In screen.
