Attribute Prompt

You determine a single attribute, then users can select to define the report
filter when they execute it. You can also let users select an attribute
from a set of attributes, and then select elements from their chosen attribute.
To create a new ATTRIBUTE QUALIFICATION
prompt:
- Go to Reports > Setup > Create EI Prompt.
- Select ATTRIBUTE QUALIFICATION PROMPT.
- On the DEFINITIONS tab, choose one of the following options:
- CHOOSE AN ATTRIBUTE: If you select this option, the user can
select elements from the attribute you specify.
- Click the ATTRIBUTES button on the right.
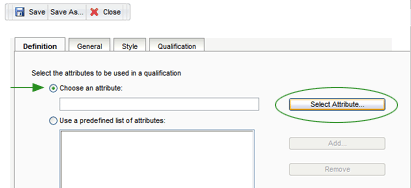
- Select the attribute.
- Click OK.
- USE A PREDEFINED LIST OF ATTRIBUTES - If you select this option,
you create a list of attributes from which the user selects.
- Click the ADD button, then locate the attribute folder
that you want to use, and click once on the folder name to
select it.
- Select an element from the AVAILABLE column on the left,
then click the right arrow button to move the element to the
SELECTED column on the right. (Use the control key to select
multiple elements.) Add all of the elements you want to appear
in the list. If you want to select all elements on the left,
then click the double right arrow button.
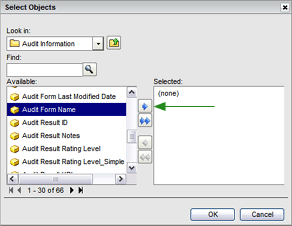
Note that to remove an element from the Selected column,
select it and click the left arrow button. To remove all elements
from the Selected column, click the double left arrow button.
- When you're finished selecting the elements to include,
click the OK button.
 |
To
remove an element, select it in the list, then click
REMOVE. You can remove all entries in the list by
clicking the CLEAR button. |
- USE THE RESULT OF A SEARCH OBJECT - A search object will search
for and display specific project objects when the user executes
the report. This lets you prompt the user with the most up-to-date
objects in the project. Use this option to present the user with
a list of attributes, from which they can choose one.
- To determine which attribute forms to display to the user,
select one of the following options from the DISPLAYED FORMS droplist:
- ALL ATTRIBUTE FORMS: This option allows users to see and
select from attribute elements within all attribute forms.
It is the default choice.
- BROWSE FORMS: This option allows users to see and select
from only the attribute forms defined as browse forms. (Note:
Only forms specified by RizePoint as browse forms All attribute
forms defined as browse forms are available when the user
browses the related attribute. Contact RizePoint for assistance.
- Click the GENERAL tab.
- Enter a title and brief description for this prompt.
- To require users to answer the prompt before running the report,
select the PROMPT ANSWER IS REQUIRED check box.
- Set the maximum and minimum number of prompt answers allowed,
if you choose. Note that you may specify a minimum number even
if you do not specify a maximum number.
- Click the STYLES tab.
- Select the display style.
- Fixed height and/or width of the text box - This ensures that
the prompt's text fields and options are a fixed size.
- Orientation - Select VERTICAL or HORIZONTAL to determine how
prompt options are arranged. To determine the number of prompt
answers displayed in a row or column (depending on alignment),
enter a number in the Arrangement Size field.
- To allow users to use a search box to locate prompt answers,
select the SHOW SEARCH BOX check box. Searching for objects allows
analysts to quickly locate specific objects to use to answer the
prompt. To ensure that users use the search box to locate answers,
select the Make Search Required check box.
- If you are using the SHOPPING CART display style, you can select
the Use Folder Structure check box to display the prompt choices
in a folder structure. (This option is useful when the same object
with the same name is saved in multiple folders.)
- Click the QUALIFICATIONS tab.
- Select the type of qualification from the EXPRESSION TYPE ALLOWED
droplist. Then:
- Select the default condition (SELECT or QUALIFY) that is
displayed in the prompt.
- Select the default condition operator (for example: equals,
contains, greater than, begins with, etc.)
- To set a maximum number of elements in the list, click
the MAXIMUM NUMBER checkbox, then specify the maximum number
to allow.
- To allow users to import a list of attribute elements from
which they can choose, select the ALLOW ELEMENT IMPORT checkbox.
- To allow users to modify expressions, select the ALLOW MODIFICATION
OF SELECTED EXPRESSION checkbox.
- To ensure that users can only use a single condition operator
(AND/OR) between all of the conditions in an expression, select
the Use a single logical operator between all conditions check
box.
- To ensure that users can choose a default operator to use
between each condition, select the Allow the user to set independent
logical orders between conditions check box.
- To save the prompt, select SAVE AS. The Save dialog box opens.
- Specify a name, description, and the location in which to save
the prompt and click OK.
This prompt will now be available to add to a report. See Adding
a Prompt to a Report.
