Creating Subscriptions (L1 and L2)

You can create two different types of subscriptions:
- Create an email subscription to the report so that it is automatically emailed to a designated recipient according to the schedule you specify.
- Create a history list subscription to a report so that it is automatically run at a specified time and then stored in memory for 24 hours, making it immediately available when you select it for viewing later that day. If you view a particular report on a regular basis (for example, every Monday), you may want to create a history list subscription for it so that when you go to view the report, you won’t need to wait for it to run.
CREATING AN EMAIL SUBSCRIPTION
You may create an email subscription either from the report folder or directly from the report window.
Note that when creating an email subscription from the Report window, the report as currently prompted is sent, so there is no need to select which prompts to use in the subscription. When creating an email subscription from the report folder, you must also prompt the report as you want it run (unless the prompts have been saved with the report).
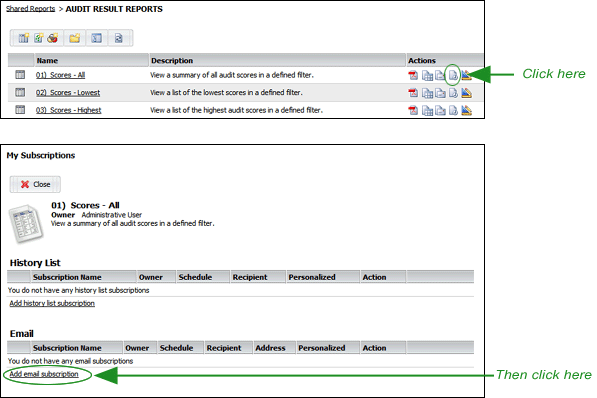
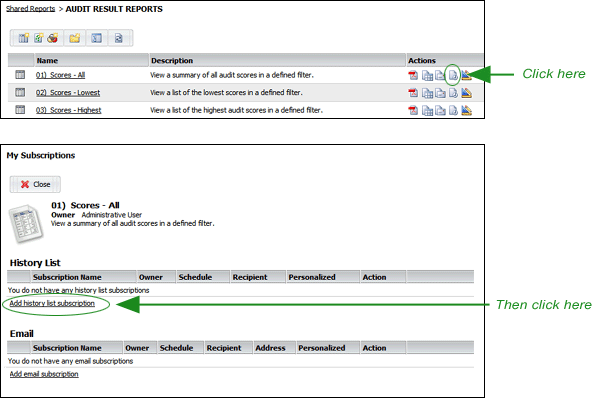
- From the REPORT FOLDER, click the SUBSCRIPTIONS
 button to open the list of current subscriptions, then select the ADD EMAIL SUBSCRIPTION link.
 |
Additional ACTIONS buttons may be available for Level 2 Users. |
-- OR --
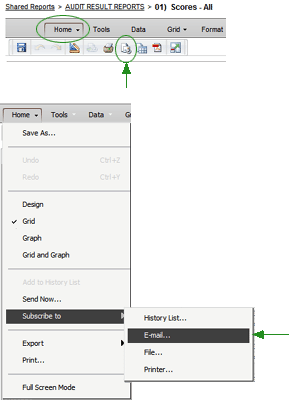
From the REPORT WINDOW, click the EMAIL SUBSCRIBE button on the Home tab toolbar, or select SUBSCRIBE TO > EMAIL from the Home menu.
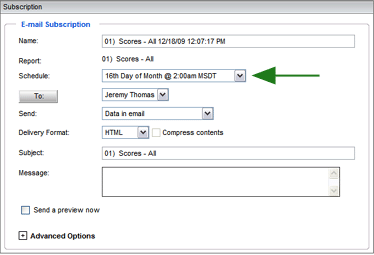
- You may change the name of the subscription that appears in the NAME field. By default, the report name, with the date and time the subscription was created, appears here.
- Select the schedule from the Schedule droplist.
-
If you have already added the recipient's email address, you may select it from the droplist.
-- OR --
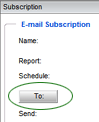
Click the TO button to open the Recipient Browser window.
To add multiple recipients:
- Use the droplist at the top to select recipients from either the SHARED LIST or the PERSONAL LIST.
- Select the desired recipients from the AVAILABLE column on the left. Use the CTRL key to select multiple recipients.
- Click the LEFT ARROW button to move the selected recipients from the AVAILABLE column to the SELECTED column.
- Click OK to close the Recipient Browser window.
To add a new recipient:
- Enter the name of a new recipient in the ADDRESS NAME field.
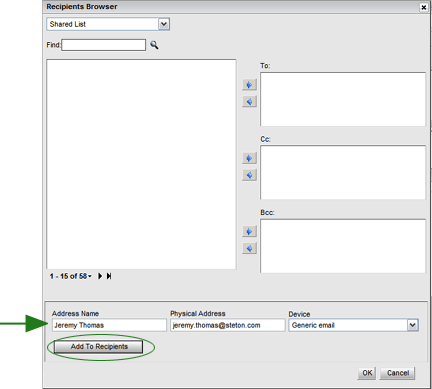
- Enter the recipient's email address in the PHYSICAL ADDRESS field.
- If you know the recipients email client, you may select it from the DEVICE droplist. If you do not know it, select GENERIC EMAIL from the list.
- Click the ADD TO RECIPIENTS button.
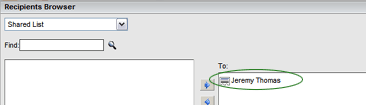
The email address appears in the TO field on the right. You may continue to add recipients.
Note that email addresses you enter are stored in your Personal List. Use the droplist at the top to display addresses you've added.

- When you're finished, click the OK button.
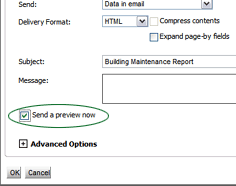
- From the Delivery Format droplist, select the format in which to send the report. Click the COMPRESS CONTENTS checkbox to create a zip file of the report (not available for HTML). The report will be delivered to the individual’s email inbox as an attachment to an email message.
- Enter the Subject of the email, and add a message, if desired.
- If you're creating the subscription from the Report folder and the prompts have not been saved with the report, the prompts are displayed directly below the email setup screen. Select the prompts to set up the report as you want it run before emailing the subscription to the recipient. See Answering Prompts for more information.
|
If you're creating the email subscription from the Report window, the report has already been prompted, and this subscription will use the current prompts. If you want the report to use different prompts, then create the report from the report folder instead of from the report window. |
- To send a preview of the subscription at this time, click the PREVIEW NOW button. The subscription is immediately sent to the recipient.
|
If at some time you wish resend a subscription for some reason, you may simply edit the subscription, then click the PREVIEW NOW button. The subscription will be immediately sent, without changing any of the existing parameters of the subscription. |
- Click the OK button. A message informs you that the email subscription was successfully created.
- Click the OK button to close the confirmation dialog.
If you've created the subscription from the report folder, click the CLOSE button at the top of the page to return to the folder.
Managing Email Addresses
If you're going to add several addresses, it is easier to do so from the Email Addresses page of the Preferences dialog. It allows you to add new email addresses, edit or delete existing email addresses, or change the default email address that is selected in the Address droplist.
CREATING A HISTORY LIST SUBSCRIPTION
- From the REPORT FOLDER, click the SUBSCRIBE button
 to open the Subscribe dialog, then click the ADD SUBSCRIPTION link in the History List Subscriptions section of the window.
-- OR --
From the REPORT WINDOW, click the HISTORY LIST button on the Home tab toolbar, or select SUBSCRIBE TO > HISTORY LIST from the Home menu.
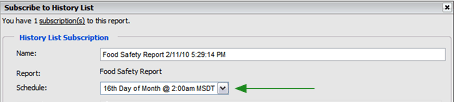
- Enter a name for the subscription, or use the default name provided.
- From the Schedule droplist, select the time and day that you want to run the report, and click OK.
- If the report includes prompts, all prompts are displayed. The selections you make for these prompts are used whenever the report is run. If you need to edit these prompts, you can do so later by clicking the EDIT
 button once you've defined and saved the subscription. See Answering Prompts for more information.
|
If you create the subscription from the report window after the report has been run, then the report has already been prompted, and this subscription will use the current prompts |
- Click the OK button.
If you created the subscription from the report folder, click the CLOSE button at the top of the page to return to the report folder.
The report will be run automatically at the time you specified and then remain in your History List for 24 hours. You will not need to wait for the report to run. It will be immediately available for viewing.
You may also send the report to the History List of other users. To specify the users that will receive the report in their History Lists:
- Click the TO button. The Recipients Browser dialog box opens. By default, your user name appears in this field.
- To select recipients, move one or more names from the list on the left to the TO list on the right.
- Click OK when you are finished.
- To send the report or document to the recipients' History Lists immediately after creating the subscription, select the RUN SUBSCRIPTION IMMEDIATELY check box.
- Expand the ADVANCED OPTIONS.
- To ensure that newer versions of the report overwrite previous versions in the recipients' History Lists, select the THE NEW SCHEDULED REPORT WILL OVERWRITE VERSIONS OF ITSELF checkbox.
- The DO NOT DELIVER AFTER checkbox allows you to select a date when the subscription will expire.
- If you want to have a delivery notification email sent when the delivery is sent, select the SEND NOTIFICATION TO EMAIL ADDRESS checkbox.
- Click OK to save and close. The Subscribe to History List dialog box closes. The file will be delivered to the specified recipients' History Lists on the specified schedule
VIEWING CURRENT SUBSCRIPTIONS
To view your current email or history list subscriptions to a specific report:
- From the Report folder, simply click the SUBSCRIBE button beside the report in the folder window.
- From the Report window, click the EMAIL SUBSCRIBE
 or the HISTORY SUBSCRIPTION button on the Home tab, then click the SUBSCRIPTIONS link.

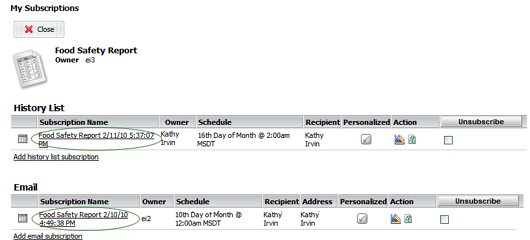
All subscriptions to this report are listed.
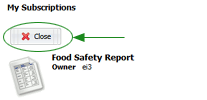
To return, click the CLOSE button at the top of the subscription list.
DELETING and EDITING A SUBSCRIPTION
In the subscriptions list, notice that an EDIT button. a PERSONALIZE button, and an UNSUBSCRIBE checkbox appear beside each email or history list subscription, allowing you to edit or delete the scheduled email subscription.
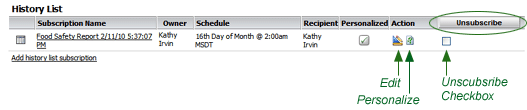
- Click the EDIT button beside a report to edit the subscription.
- Click the PERSONALIZE button to "personalize" the prompts for this subscription.
- Select the checkbox associated with a report, then click the UNSUBSCRIBE button to delete the subscription. (This action does not delete the report; it merely deletes the subscription to the report.)
