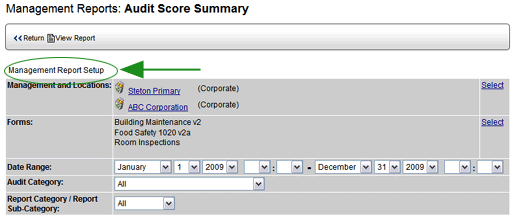
Creating a New Report

To create a new report:
- Click the NEW button.

- Select the type of report that you want to create from the Report
Type drop-down list. All available report types appear in this list.
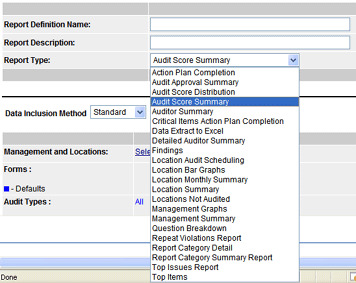
- Enter a name and description for the report.
- Select a DATA INCLUSION METHOD:
- STANDARD - Configure the report by selecting the management
levels/locations, audit forms, audit types, and auditors.
- SCHEDULE - Configure the report by selecting one or more schedules.
(If you select this option, select the schedules to include in
the report, then go to Defining the Report
Configuration Options.)
DEFINING THE CONTENTS OF THE REPORT
You can configure the report to include results from audits conducted:
- on specified management groups and locations
- on specific audit forms
- on specific types of audits
- by specified auditors
- during the specified date range
- on active locations only, on inactive locations only, or on both
active and inactive locations
Users
You can restrict access to management reports to specified users and/or
roles.
- Click the Users or Roles - SELECT link.
- Click the ADD button.
- Select the Users or Roles that you want to have access to this
report.
- Click SAVE & RETURN.
The total number of selected users or roles is displayed.

Management and Locations
The report will only include results from audits conducted on the management
levels or locations specified here.
- Click the Management and Locations SELECT button to select the
management levels and/or locations to include in this report.
- Click the ADD button.
- Place a check beside the management level to select it...
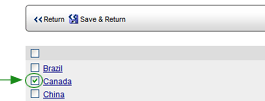
-- OR --
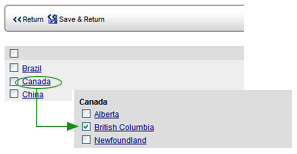
Click on the management level link to navigate down through the
management hierarchy to locate the management group or location that
you want to add, then place a check beside it to select it. You may
select multiple management levels and locations.
- Click the SAVE & RETURN button. (Note that once you've added
a management level, an EXCLUDE link appears beside the management
level name. To exclude part of level, click the EXCLUDE link.)

- Click the SAVE & RETURN button.
Products* (optional)
When this option is enabled, you can specify which products and product
categories to include in the report.
Forms
The report will include results from audits conducted only on the specified
forms.
- Click the Forms SELECT button to specify the audit forms that you
want to include in the report.
- Place a check in the SELECT column beside the forms you want to
be available. If the report is set up to allow for changing the configuration
options, users may select one or more of the selected forms to include
in a report.
- Place a check in the DEFAULT column beside the forms you want to
be included when the report is generated with the setup options you
define here. When you place a check in the DEFAULT column, a check
automatically appears in the SELECT column as well.
- Click the SAVE & RETURN button. All forms designated as default
forms display in blue. Forms which may be included in the report appear
in black.

Audit Types
Any audit type that has been configured to be included in management
records can be included in this report. (Audit types are configured in
Audit > Audit Setup > Audit Types.) If you don't
select any audit types, this setting defaults to ALL audit types.
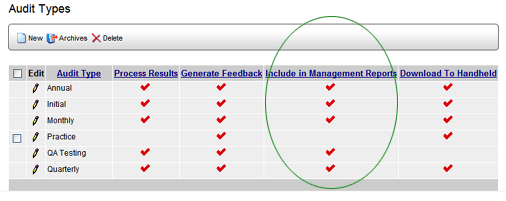
- Click the Audit Types SELECT button.
- Place a check in the SELECT column beside the types of audits you
want to be available to include in the report. To select all audit
types, click the selection checkbox at the top of the SELECT column.
To deselect all audit types, uncheck
the box at the top of the column.
- Place a check in the DEFAULT column beside the audit types you
want to be included when the report is generated with the setup options
specified here. When you check the DEFAULT column, the SELECT column
becomes selected also. To set all audit types to DEFAULT, check the
box at the top of the DEFAULT column. To deselect all types, uncheck the box at the top of the column.
- Click the SAVE & RETURN button. All audit types designated
as default types appear in blue; audit types designated as available
appear in black.
Auditors
You can configure the report so that only results from audits conducted
by specific auditors are included. All auditors associated with the audit
forms you selected appear in this list. If no forms have been associated
yet, no auditors appear in this list. You must specify the audit forms
first.
- Click the Auditors SELECT button.
- Check the SELECT column to specify all auditors available to include
in the report.
- Check the DEFAULT column to specify all auditors that are included
when the report is generated with the setup options specified here.
- Click the SAVE & RETURN button. All auditors designated as
default auditors appear in blue; auditors designated as available
to be included appear in black.
Date Range Type
This setting determines the date range label that appears at the top
of the report.
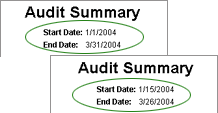
- DATE RANGE - This option displays the actual date range
specified in the Date Range fields below, regardless of when
the audits actually occur.
- FIRST AUDIT DATE / LAST AUDIT DATE - This option displays
the dates on which the first and last audits were actually
conducted within the time specified.
|
 |
 |
The FIRST AUDIT DATE / LAST AUDIT DATE option
is selected by default when you create a new report definition.
If you would prefer to have the DATE RANGE option selected by
default instead, contact your RizePoint representative. |
Automatic Update Date Range
Select an AUTOMATIC UPDATE DATE RANGE option. These options automatically
update the date range, relative to the date on which the report is run.
The following options are available:
- NO AUTO UPDATE -This option uses the exact dates specified in the
DATE RANGE fields below each time the report is run. (The report may
be configured so that users can select any date that falls within
the dates specified below before running the report. See Date
Range in Defining Report Configurations,
below.) This is the default option.
- MONTHLY - This option automatically sets the date range from the
first day of the previous calendar month to the last day of the previous
calendar month. For example, if the report is run on February 4, results
from the previous month, January 1 - January 31, would be displayed.
When this option is selected, the dates specified in the DATE RANGE
field below are ignored.
- QUARTERLY - This option automatically sets the date range from
the first day of the previous quarter (January, April, July, or October)
to the last day of the previous quarter. For example, if the report
is run on April 10, results from the previous quarter, January 1 -
March 31, would be displayed. When this option is selected, the dates
specified in the DATE RANGE field below are ignored.
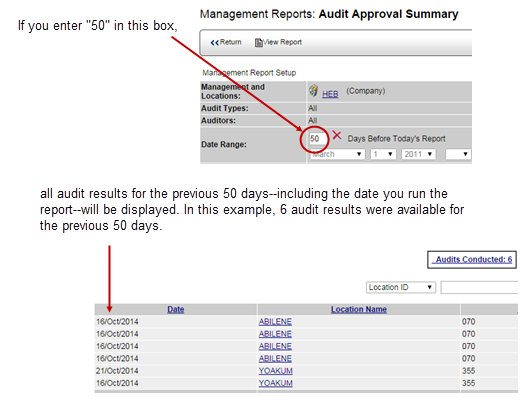
- PREVIOUS DAYS (INCLUDING TODAY) - This option allows a user to
configure the management report to display all audit results uploaded
for the previous number of days—including
the day the report was generated—designated
in the numeric text field. For example, if you enter "100"
in the field, the management report will display all audit results
associated to that report for the previous 100 days including the
day that you generated the report. The maximum number of days to select
is 999. By default, this option is inactive when a user creates a
new report. The feature is enabled by configuring the report with
the DATE RANGE option in the SHOW REPORT CONFIGURATION OPTIONS section.
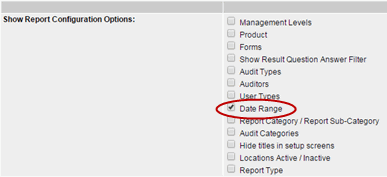
Date
Range Options for Management Reports
Using the PREVIOUS DAYS in the Automatic
Update Date Range:
- Navigate to Reports > Management
Reports. A list of all management reports assigned to the user
will display.
- Select the management report you wish to view. The Management Report
Setup screen will display.
- Navigate to the AUTOMATIC UPDATE DATE RANGE field.

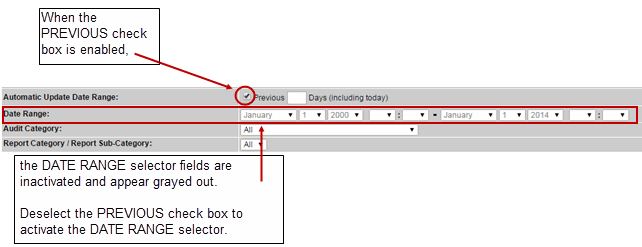
- Select the PREVIOUS check box.
 |
The PREVIOUS
check box is a toggle between the AUTOMATIC UPDATE DATE RANGE
(Previous Days) functionality and the DATE RANGE selector
field below it. Enabling the PREVIOUS check box toggles off
the DATE RANGE selector below. If you deselect the PREVIOUS
check box, the DATE RANGE selector is toggled on. |
- Enter the previous number of days in the numeric text field that
you want the application to search for audit results associated to
this management report. For example, entering a "50" in
the numeric text field will display all audit results that were created
during the previous 50 days—including
today. The maximum number of previous days allowed in the field is
999.
- Click VIEW REPORT. All of the audit results for the previous
number of days designated in the numeric text field will display.

- Click RETURN to return back to the management configuration page.

Locations
The LOCATIONS droplist allows you to filter the report to include results
from active locations only, from inactive locations only, or from both
active and inactive locations.
DEFINING THE REPORT CONFIGURATION
OPTIONS
The lower section of the report definition screen contains options that
determine which fields may be configured at the time the report is run.
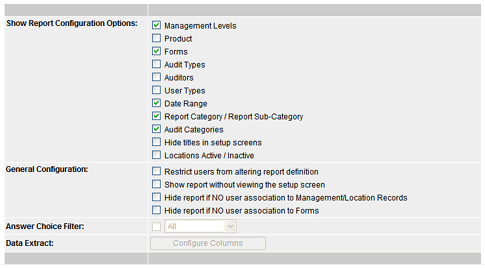
For example, a user may select one set of options and run the report
based on those options. Then, an entirely different set of options can
be selected, and another report run.
The following options are available:
SHOW REPORT CONFIGURATION OPTIONS
GENERAL CONFIGURATION
- HIDE REPORT IF NO USER ASSOCIATION TO MANAGEMENT/LOCATION RECORDS
- If the user is not associated with at least one of the specified
management record or locations associated with this report definition,
then the report is not available when this option is selected.
- HIDE REPORT IF NO USER ASSOCIATION TO FORMS - If the user is not
associated with at least one audit form specified in the report definition,
then the report is not available when this option is selected.
- EXCLUDE APPROVED ACTION PLANS - (available with the Action Plan
Completion and the Critical Items Action Plan Completion reports only.)
When this option is enabled, only audit results that contain action
plans that have not yet been approved are included in the report.
When this option is disabled, all results are included, whether the
action plans have been approved or not. (NOTE: You may change
the font
color of audits that contain overdue action items. You may also
add a column to the report that displays the number of action plans
that have not
yet been approved.)
- ANSWER CHOICE FILTER - This option is used when creating a Data
Extract to Excel report only. See instructions below.
- DATA EXTRACT - CONFIGURE COLUMNS - This button is used when creating
a Data Extract to Excel report only. See instructions below.
Creating a DATA EXTRACT
TO EXCEL report:
If you're creating a DATA EXTRACT TO EXCEL report, you'll need to define
which data you want to export to your spreadsheet, and into which columns
you want the data placed.
- In the Data Extract section at the bottom of the screen, click
the CONFIGURE COLUMNS button. The Column Configuration screen opens.
All available data types are listed here. (Click
here for a description of each field.)
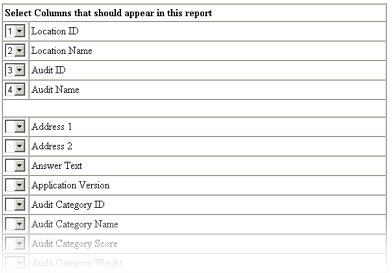
- Use the drop-down list beside the data type to select the column
in which you want the data to appear. Each data type will appear in
a separate column in Excel when it is exported.
Notice that as you assign a column order to a data type, the data
type is moved to the top section of the screen and appears in the
order assigned.
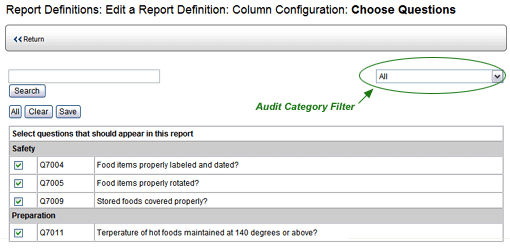
Some of the data types require additional information. If additional
data is required, a link appears beside the data type once it has
been selected. For example, both Answer Text and Question Text data
types require further configuration. (NOTE: If you want to include
answers from text questions, select the Auditor Input data type.)
- Click the link.

- Locate the required data, then click the SAVE button.
- To remove a data type from the top section (exclude it from the
data that is exported), select the blank space at the top of the drop-down
list.
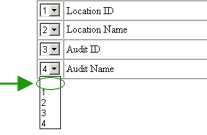
- When all columns have been configured, click the RETURN TO REPORT
DEFINITION link to return to the Report Definition screen.
- In the Report Definition screen, directly above the CONFIGURE COLUMNS
button, is an ANSWER CHOICE FILTER drop-down list. This drop-list
is used for Data Extract to Excel reports only. If you selected any
of the following options in the Column Configuration window (above),
you can further filter the data that is extracted to the Excel spreadsheet:
- ANSWER TEXT
- AUDITOR INPUT
- CHOICE POINTS
- CHOICE TOTAL POINTS
- CORRECT CHOICE
- CRITICAL CHOICE
- QUESTION COMMENTS
- QUESTION ID
- QUESTION TEXT
- If you selected one of the above options from the Column Configuration
screen, you can filter which data to include in the report. Select
an option from the ANSWER CHOICE FILTER drop-down list:
- ALL - information associated with all answer choices is extracted
to the report.
- COMPLIANT - Only information associated with answer choices
designated as Correct is extracted to the report.
- NON-COMPLIANT - Only information associated with answer choices
designated as Incorrect is extracted to the report.
- CRITICAL - Only information associated with answer choices
designated as Critical is extracted to the report.
- If you want the ANSWER CHOICE FILTER to be available in the Report
Setup window when this report is run, place a check in the ANSWER
CHOICE FILTER box beside the drop-down list. If this box is not checked,
the ANSWER CHOICE FILTER drop-down list will not be displayed in Mobile
Reporter, and therefore the setting cannot be changed.
- Click SAVE & RETURN to save the report.
 |
*OPTIONAL
FEATURE - Contact your RizePoint representative to enable this
option. |


