Products

To add new products to the product database:
- Go to System > Product Manager > Products.
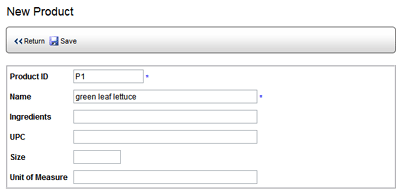
- Click NEW. The New Product screen opens.

- A PRODUCT ID is assigned automatically. You may change the ID,
but the ID must be unique.
- Enter a PRODUCT NAME.
- Several information fields are also available. These fields are
optional. (NOTE: The labels may be edited to meet your needs. See
Using the Edit Pencil
to Edit Screen Contents.)
- PRODUCT DESCRIPTION - This field can contain up to 255 alphanumeric
characters.
- BAR CODE - This field can contain up to 50 alphanumeric characters.
- SIZE - This field can contain any number, including decimals.
- UNIT OF MEASURE - This field contains the unit of measure for
this product (e.g., ounces, pounds, liters, inches, meters, inc.)
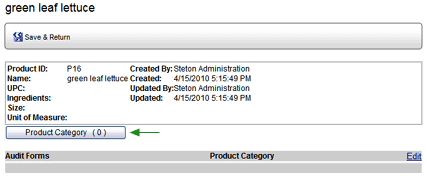
- Click SAVE. The Product Information screen opens. (NOTE: To access
the Product Information screen at a later time, click on the name
of the product in the product list.)

- Click the PRODUCT CATEGORY button to assign this product to a category:
- Click the ADD button to display a list of categories that have
already been defined. If a category contains subcategories, it
appears as a link. You can click the link to navigate to the level
below.

- Once you locate the category in which to place this product,
click the ADD icon (plus sign) beside the category name.

You may continue to add products in this manner.
 |
To remove the product from a product
category, click the trashcan icon beside the category to remove
it. |
- Click the RETURN button to return to the product information screen.
Associating
the product with an audit form:
- Go to System > Product Manager > Products.
The Product list is displayed.
- Locate the product in the list, then click on the product name.
(NOTE: Do not click the Edit pencil. Clicking the Edit pencil allows
you to change the Product Name, Product ID, Description, etc. It does
not allow you to edit the associated audit forms.)
The Product Information window opens.
- Click the Audit Forms EDIT link on the right to associate audit
forms with this product.

- Select the audit form.
- Click the SAVE button.
Adding the product to a category:
 |
You may have already associated the product
with a category when you initially created it. |
- Go to System > Product Manager > Products.
The Product list is displayed.
- Locate the product in the list, then click on the product name.
(NOTE: Do not click the Edit pencil. Clicking the Edit pencil allows
you to change the Product Name, Product ID, Description, etc. It does
not allow you to add or edit the category.)
The Product Information window opens.
- Click the PRODUCT CATEGORY button.
- Click the ADD button to display a list of categories that have
already been defined. If a category contains subcategories, it appears
as a link. You can click the link to navigate to the level below.
- Once you locate the category in which to place this product, click
the ADD icon (plus sign) beside the category name.

You may continue to add products in this manner. To return to the Add
New Product screen, click the Product breadcrumb.
To edit a product:
- Go to System > Product Manager > Products.
- Click the Edit pencil
 beside the product that you want to edit. You may change the Product
Name, Product ID, Description, etc.
- Edit the fields as desired.
- Click the SAVE button.
To delete a product:
- Go to System > Product Manager > Products.
- Locate the product that you want to delete, then check the corresponding
box in the column on the right.

Note that you may select multiple products to delete at the same
time. Clicking the ALL button selects all products; clicking the CLEAR
button deselects all products.
- Click the DELETE button. A confirmation message displays to confirm
the deletion of the selected products.
- Click SAVE. The selected products are removed from the Products
list.


