
OPTIONAL FEATURE - Contact your RizePoint representative to enable/disable the Audit Result 2.0 functionality to use this feature. |
The Audit Result Approval 2.0 page is accessible by selecting AUDIT > AUDIT RESULT APPROVAL 2.0
from the main menu bar.

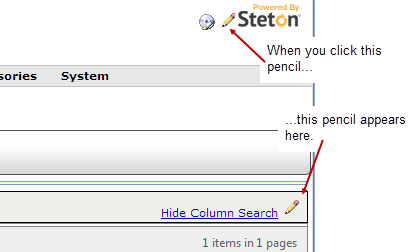
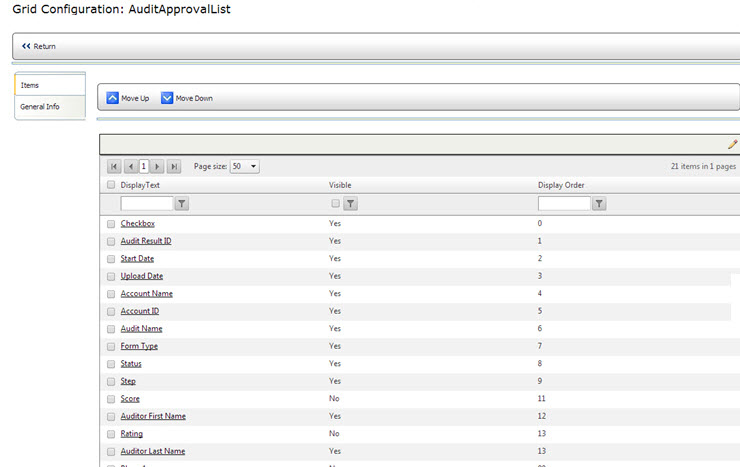
The Audit Result Approval 2.0 grid and columns are configurable by activating the application's configuration Edit Pencil in the upper right corner of the window header. Using the Edit Pencil allows you to choose the columns that display and the order in which they are arranged in the grid.
To select the Audit Result Approval 2.0 grid columns that will display:


COLUMN NAME |
DESCRIPTION |
| Account ID | Displays the ID of the account as it appears in the Location Record. |
| Account Name | Displays the name of the account as it appears in the Location Record. |
| Address 1 | Displays the address as it appears in the Location Record. |
| Address 2 | Displays the address as it appears in the Location Record. |
| Audit Name | Displays the name of the audit form. |
| Audit Result ID | Displays the Audit Result ID which is auto-assigned by the database when the audit results are uploaded. |
| Auditor First Name | Displays the auditor's first name. |
| Auditor Last Name | Displays the auditor's last name. |
| Checkbox | Displays a check box to select audit results. |
| City | Displays the city as it appears in the Location Record. |
| Country | Displays the country as it appears in the Location Record. |
| Form Type | Displays the type of audit form (annual, monthly, quarterly, etc.) |
| Phone 1 | Displays the Phone 1 number as it appears in the Location Record. |
| Postal Code | Displays the postal code as it appears in the Location Record. |
| Rating | Displays the audit rating. |
| Score | Displays the audit score based on the client's scoring system. |
| Start Date | Displays the audit start date. |
| State | Displays the state as it appears in the Location Record. |
| Status* | Displays the status of the audit results. There are three status levels: PENDING APPROVAL, APPROVED, or DISAPPROVED. |
| Step* | Displays what step the approval process currently resides. Refer to the steps in the Audit Result Approval Rule created for that set of audit results to determine the number of steps that have been set for that rule. |
| Upload Date | Displays the date that the audit results were uploaded. |
| It is best practice to ensure that you have the STATUS and the STEP columns always displayed because these provide an instant update on the progression of audit results through the approval process. |

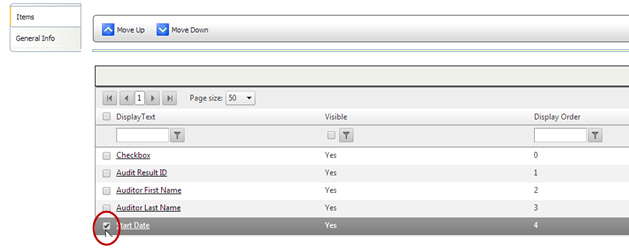
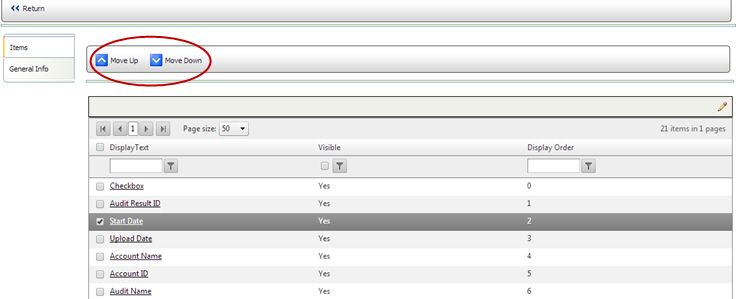
To edit the left/right position of the column in the grid:
Check the box beside the grid
item that you want to edit.

Click the MOVE UP button to
move the column one position to the left, or click the MOVE
DOWN button to move the column one position to the right.

Close the browser window or the browser tab.
If the changes that you made
are not visible, reload the Audit Approval page.
![]()
To edit other specifications of the column:
1. Select the grid item that you want to edit.
2. Click the EDIT button.
3. Edit the specifications
as desired. You may edit the following items:
VISIBLE (required): Allows you to specify whether or not to display this
column in the grid.
DISPLAY ORDER (required): Allows you to change the position of the column
by entering a different column order in this field.
FORMAT STRING: Allows you to specify a format to use for certain fields
such as Date/Time or Y/N.
COLUMN DISPLAY NAME (required): Allows you to change the label that appears
at the top of the column.
4. Click SAVE.
5. Click RETURN.
6. Close the browser window or the browser tab of the configuration page.
7. If the changes
you made are not visible, reload the Audit Approval page.
![]()
See Audit Result Approval 2.0 Permissions.
See also: Editing the Contents of the Grid.

ref: AuditApproval2