
OPTIONAL FEATURE - Contact your RizePoint representative to enable/disable the Audit Result 2.0 functionality to use this feature. |
The purpose of an Audit Result Approval Rule is to capture audit results that require a multi-level audit approval process and route them into a separate queue—the Audit Result Approval 2.0 queue—to be approved by multiple approvers before being processed by the RizePoint software. Audit results will display in the Audit Result Approval 2.0 queue only if an Audit Result Approval Rule was created before the audit was conducted or uploaded.
To set up an Audit Result Approval Rule:
Create the New Audit Result Approval Rule:
From
the menu bar, select Audit >
Audit Setup > Audit Result Approval Rules.
The Approval Rules grid displays.
Navigate
to the Actions dropdown box in the right corner of the grid and
select CREATE NEW.

A Create New Rule pane will display below the list of existing
Approval Rules.

Enter
a name for the new rule in the Rule Name field (required) and
a description of the rule (not required).

Click SAVE.

Note that the Rule Details Summary tab displays the name of the
rule, the description (if provided), the Restart on Disapproval
check box, and dates that the rule was created and modified.

To edit an Audit Result Approval Rule
From the main menu, select Audit > Audit Setup > Audit Result Approval Rules 2.0.
Select the name of the Audit Result Approval Rule to be edited.
From the Rule Details pane, click
the EDIT button.

The fields in the Summary tab pane are now editable allowing you
to:
Edit the rule name.
Add, edit or delete the rule description.
Click SAVE to save the changes, or click CANCEL if you do not wish to save any changes.
Define the Audit Result Approval Rule's Criteria
An Audit Result Approval Rule is made up of audit result attributes called CRITERIA that are specific to that rule. When audit results match criteria specified in an Audit Result Approval Rule, the software captures the results and routes them to the Audit Result Approval 2.0 page—a queue of submitted audit results to be approved in the multi-level audit approval process. When you set up an Audit Result Approval Rule, the configuration of rule criteria is determined and customized by you.
The attributes for a rule are:
Audit Form(s)
Audit Type(s)
Location(s)
An Audit Result Approval Rule does not require one of each of the attributes, but it must contain at least one audit form, or one audit type, or one location. For example, one rule may be comprised of simply one audit form. Another rule may be comprised of a specific audit form, a specific location, and an audit type. Audit results will only be routed to the Audit Result Approval 2.0 queue if the Audit Result Approval Rule was created before the audit was conducted or uploaded. After an audit has been approved, it will be automatically routed to the VIEW AUDIT RESULTS page. |
To define the criteria for an Audit Result Approval Rule:
From the menu bar, select Audit > Audit Setup > Audit Result Approval.
Select the name of the Audit Result Approval Rule to which you will assign criteria.
Click the CRITERIA tab. If you just finished naming the rule, simply click on the CRITERIA tab next to the SUMMARY tab.
Specify
the rule's criteria. In this example, we will set up an
Audit Result Approval Rule that uses one audit form, one audit
type, and one location.
IMPORTANT: You
may assign more than one of each attribute to the rule by holding
the SHIFT key while clicking on each criterion to be placed in
the rule. Audits that match rule criteria will be captured and
sent to the Audit Result Approval 2.0 grid. Be cautious to avoid
setting up rules that "overlap" such that an incoming
audit result could potentially match more than one rule.
From
the Audit Form grid, click ADD.

A pop-up list of all audit forms to which the logged-on user has
access will display, and the Approval Rules grid will be grayed
out in the background. By default, 10 grid items display alphabetically
per page. To view more audit forms, use the page selector at the
bottom of the list.

To find a specific audit form, use the column search filter on
the right side of each column.

Select
the audit form(s) to be used in the rule.

Notice that the Audit Forms grid displays the Audit Name, Audit
Reference, Audit Description, and the audit form's Creation Date.

Click SAVE. Notice that the name of the audit form you selected now displays in the Audit Form criteria grid.
If you will assign an audit type to the rule, navigate to the Audit Type grid and click ADD. To view more audit types, use the page selector at the bottom of the list. To find a specific audit type, use the column search filter on the right side of each column.
Select
the audit type(s) to be used in the rule. The Audit Type Name
column displays the names of all audit types from which you can
choose.

Click SAVE. Notice that the name of the audit type you selected now displays in the Audit Type criteria grid.
If you will assign a location to the rule, navigate to the Location grid and click ADD. The ADD LOCATIONS selection grid will display. Notice that the location name and location ID displays in this grid.
Select
the location(s) to be used in the rule.
")
Click
SAVE. The name of the location you selected now displays in the
Locations grid.
Notes about Audit Result Approval Rule Criteria
If an audit matches the criteria of an Audit Result Approval Rule, the rule is considered "in use."
Audit Result Approval Rule Criteria can be changed, added, or deleted at any time—even if the rule is "in use."
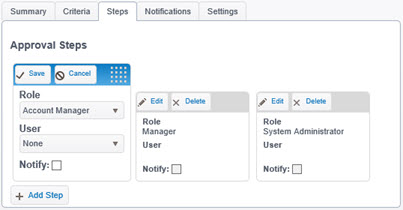
Specify the Steps for the Audit Result Approval Rule
The steps in an Audit Result Approval Rule define who the audit result approvers are, and the sequence that each approver(s) reviews the result.
From the menu bar, select Audit > Audit Setup > Audit Result Approval Rules.
Click on the name of the Audit Result Approval Rule to which you will assign steps. If you are creating a new rule and have already named it and designated the rule's criteria, simply click on the STEPS tab next to the CRITERIA tab.
Click
the STEPS tab.

Click
the ADD STEP button.

The Approval Steps box will display.

Click
the ROLE drop-down menu. Select the role that will be responsible
for reviewing audit results for that step in the approval process.

| It is not necessary for each person to approve the audit results. Only one person—determined by your organization—in that role is required to review and approve or disapprove the audit results. |
Click
the USER drop-down menu. Select an individual user or users who
will be responsible for reviewing audit results for that step
in the approval process.

| Although it is possible to designate the name of an individual user to be notified, the best practice is to designate a role for each step. This is because once the rule is in use (i.e. once an audit matches the rule criteria, and audit results are routed to the Audit Result Approval process), it is not possible to edit the steps within a rule. You are able to edit users within a role, but it is not possible to edit the user assigned to a step once the rule is in use. |
Click
the SEQUENCE field. Using the up and down arrow keys, specify
at what step in the approval process the approver(s) will be responsible
for reviewing and approving an audit result. For example, clicking
"1" will make the role or user the first person(s) to
approve audit results.

Click SAVE. If you do not want to save this approval step, press CANCEL.
To
add another approver, click ADD STEP. Follow steps 1 through 8
above to add more approvers.

Define the Approval Rule Notifications
The Approval Rule Notifications allow you to define which users get notified during the approval process.
To define the approval rule notifications:
Select the Notifications
tab. The content of the Rules Details Notifications tab displays.

Approver Notifications - This
section allows you to identify which template to use for approved
notifications, disapproved notifications and pending approval notifications
that will be sent to the approver.
Auditor Notifications - This
section allows you to identify which template to use for disapproved
notifications that will be sent to the auditor.
Click
EDIT. The Rule Details Notification tab displays in edit mode.

Click
the drop-down arrow to view and select the appropriate templates for
each notification type. The template options available for selection
from the drop-down lists are dependent upon the templates set up to
use for your correspondence (System > Correspondence > Templates).

Click
the ADD RECIPIENT button from in the Custom Recipient List to display
a drop-down menu of standard recipient types that can be added for
these notifications. Recipient types can be selected for audits in
status Approved, Disapproved, or Pending Approval.


| There is not an option to select a recipient type for the "Disapproved Auditor" notification. |
| If Recipient Types are designated in the Audit Result Approval Rule, this will override notifications sending to the role or user for the defined Steps. |
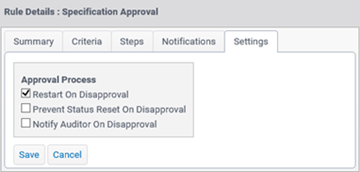
Click SAVE.
Specify the Approval Rule Settings
The Approval Rule Settings allow you to specify the approval process flow.
To define the approval rule settings:
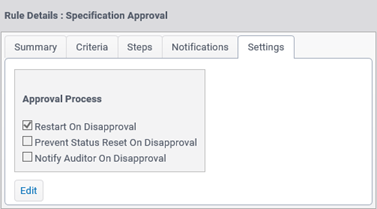
SETTING OPTIONS |
DESCRIPTION |
Restart On Disapproval |
If this setting is enabled, a previously disapproved action plan will always enter the approval process at Step 1, when the plan is resubmitted into the approval process. If this setting is not enabled, the resubmitted plan will enter the approval process at the step in which it was last disapproved. |
Prevent Status Reset on Disapproval |
If this setting is enabled, it will prevent the reset the status. It will leave the status in the current process state. |
Notify Auditor on Disapproval |
If this setting is enabled, the auditor will be notified using the template specified on the Notifications tab when the audit is disapproved. |
Editing the Steps Sequence
If an audit matches the criteria of an Audit Result Approval Rule, the rule is considered "in use." The Approval Steps of the rule are no longer editable after the rule is "in use." |
If you need to edit the sequence of steps in the Audit Result Approval
Rule:
From the menu bar, select Audit > Audit Setup > Audit Result Approval Rules.
Click on the name of the Audit Result Approval Rule you wish to edit.
Click
the STEPS tab.
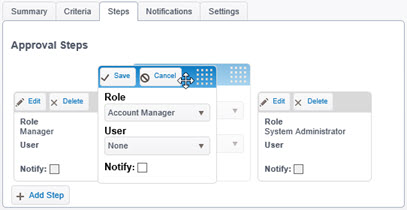
Select
the EDIT button in the step to be edited. For example, if you
would like to designate the second approver to be the first approver
in the sequence, click the EDIT button in step number 2.

Move
the mouse over the Move button. When the mouse displays a four-headed
arrow, click and drag the step to the new approval order.
Approval Step Move Button
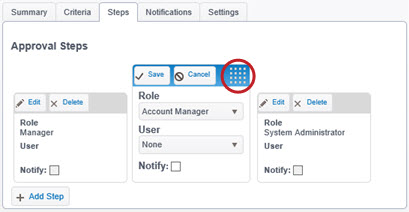
During the click and drag move, a ghost image will display to remind
you of the original approval step sequence.
Once the step has been moved into place, it remains in edit mode.
Click
SAVE.
The Approval Steps boxes are saved with the new sequence.
Delete an Audit Result Approval Rule Step
If you need to delete an Audit Result Approval Rule Step:
From the menu bar, select Audit > Audit Setup > Audit Result Approval Rules.
Click on the name of the Audit Result Approval Rule you wish to delete.
Click the STEPS tab.
Click
the DELETE button of the step you wish to delete.
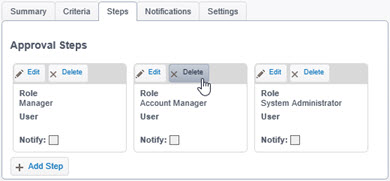
Click
OK in the confirmation dialog box, or click CANCEL to maintain
the current approval steps and cancel the deletion process.

Notes About Approval Rule Steps
After audit results are uploaded, an email notification message that there are audit results to be reviewed will be sent to the first approver(s) designated in the approval steps.
Audit results to be approved will appear in the Audit Result Approval 2.0 queue. See Approving Audit Results.
Although there is no limit to the number of approval steps that can be assigned to an Audit Result Approval Rule, it is best practice to limit the number of approvers to a manageable number determined by your organization.
If an audit matches the criteria of an Audit Result Approval Rule, the rule is considered "in use." The Approval Steps of the rule are no longer editable after the rule is "in use."
Changes to users in a role are universal. If you edit or change the users assigned to a role, those changes will be made wherever that role is assigned—even in steps of a rule that is considered "in use." This is beneficial when you need to change approvers because you will not need to delete or re-create a new rule.
To copy an Audit Result Approval Rule
It is possible to copy an existing Audit Result Approval Rule. Copying an Audit Result Approval Rule is efficient because you may only need to make minor changes to an existing rule before having it available for future audits. For example, an existing rule may use the criteria you need, but the approval steps may need to be re-ordered, or additional steps may need to be added. It is often more efficient to make changes to an existing rule than to create a new rule.
If you copy an existing Audit Result Approval Rule, remember that until it is edited, it will exactly match the original rule and any audit results could potentially match both the original rule and the newly copied rule. If that happens, audit results may unintentionally be associated to the wrong rule. For this reason, it is best practice to:
|
If you need to copy an Audit Result Approval Rule:
From the main menu, select Audit > Audit Setup > Audit Result Approval Rules.
Select the name of the Audit Result Approval Rule to be copied.
From
the Actions drop-down menu click COPY APPROVAL RULE.

A Copy Approval Rule confirmation box displays and the Approval
Rules grid will be grayed out in the background.

Click
SAVE. The copied rule will display in the Approval Rules grid.
It is now possible to edit the copied rule. Click
CANCEL if you do not wish to copy the rule.

To delete an Audit Result Approval Rule
From the main menu, select Audit > Audit Setup > Audit Result Approval Rules.
Select the name of the Audit Result Approval Rule to be deleted.
From the
Actions drop-down menu click DELETE.

Click OK
in the confirmation dialog box. The Approval Rules grid
will refresh and the rule will no longer be visible in the grid.

See Configure the Audit Result Approval Grid.

ref: AuditApproval2