
| For a list of all permissions including those associated with the Schedule group, see the Permissions List. |

The New Schedule Item window opens.


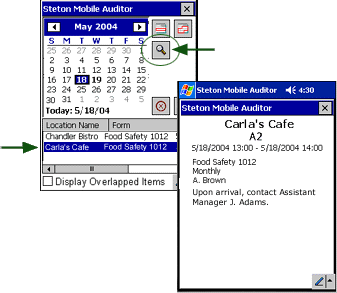
When the auditor
selects this audit in Mobile Auditor PPC, then clicks the FIND button,
these notes, along with the details of this audit, are displayed.
Notifying a Location Contact of a Pending or Past Due Audit
It is possible to send an email notification
to a primary and/or secondary location contact notifying the contact(s)
of pending or past due audits. The Notifications section of the
Schedule Manager is available only after a location has been selected
from the New Schedule Item page. See: Adding
an Audit to the Schedule.
To prepare a notification to go to a location
contact:
Read and follows steps 1 - 12 above for adding an audit to a schedule.
Navigate
to the NOTIFICATIONS section at the bottom of the Schedule Manager
page.

From
the CONTACT(S) field, select the contact(s) who will receive the notification.
Use CTRL + click
to select multiple contacts.

From
the ADDITIONAL EMAILS field, enter valid email address(es) of anyone
else to whom a notification about a pending or past due audit should
go. Separate multiple email addresses with a comma.
NOTE: Email addresses in this field must be valid, but do not
need to be associated to a contact in the auditing application.

In
the DAYS BEFORE field, enter the number of days before the audit that
you want the email to be sent.

Select
the appropriate Email Template type from the drop-down list.

| An email template must be created before it can be selected from the list. If you create a new template for this schedule manager, the email template type must be either AUDITOR SCHEDULE NOTIFICATION or MANAGEMENT SCHEDULE NOTIFICATION. The name of a new template should reflect the purpose of the email. For example, if the email is about a pending audit, an appropriate template name would be PENDING AUDIT. See: Creating a New Template. |
Email templates for the Schedule Manager include replacement tags. For
a list of available replacement tags for Schedule Manager Notifications,
see: Replacement
Tags for Schedule Manager Notifications.
When you are creating or modifying the email template, it is possible
to include additional text along with the replacement tags.
If
the email notification is for a past due audit, enter the number of
days that the audit is overdue in the DAYS OVERDUE field.

Select the appropriate Email Template type from the drop-down list.
Click
SAVE & RETURN.

| To automatically download schedule items to Mobile Auditor, see Schedule Download to Mobile Auditor. |
