Approval Process for Audit Results

 |
OPTIONAL FEATURE - Contact your
RizePoint representative to enable/disable this option. |
This option allows you to intercept an audit result before it becomes
available for reporting purposes. Rules can be created to determine which
results are "set aside" for review and approval before they
move on to the reporting module.
Once an audit result is uploaded from Mobile Auditor and validated,
rules are checked to determine if the result needs to be intercepted and
approved before it is available for reporting purposes.
When this option is enabled, two new commands become available.
- An APPROVE AUDIT RESULTS command appears in the Audit menu.
- An AUDIT RESULT APPROVAL RULES command appears in the Audit Setup
menu.
In addition, the following permissions are available:
- RESULT APPROVAL - ADMINISTRATE APPROVAL RULES (required for creating
approval rules)
- RESULTS - VIEW ALL
- RESULT APPROVAL - APPROVE RESULTS
- RESULT APPROVAL - MODIFY AUDIT NOTES
- RESULT APPROVAL - MODIFY AUDIT CATEGORY NOTES
- RESULT APPROVAL - MODIFY ENGAGEMENT DATA
- RESULT APPROVAL - MODIFY QUESTION NOTES
- RESULT APPROVAL - MODIFY QUESTION RESULTS
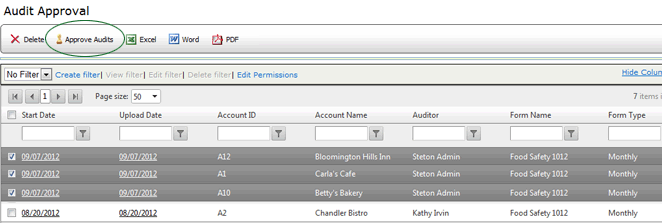
- APPROVE ALL AUDITS (This permission allows you to perform batch
approvals of audits. An APPROVE AUDITS button becomes available at
the top of the Audit Approval screen for all users who have been granted
this permission.
 |
Be sure that users who need to review and
approve the results have been given the appropriate permissions.
A user must have the RESULT APPROVAL - ADMINISTRATE APPROVAL RULES
permission in order to create approval rules. The user who will
be approving the results must have the RESULTS - VIEW ALL and
RESULT APPROVAL - APPROVE RESULTS permissions, as well as any
RESULT APPROVAL - MODIFY permissions that may be required. In
addition, the APPROVE ALL AUDITS permission is required in order
to perform batch approvals of results. |
CREATING THE RULE
You'll need to define rules to determine whether or not to hold the
results for approval before submitting them for reporting purposes.
- Log on as a user with RESULT APPROVAL - ADMINISTRATE APPROVAL RULES
permission.
- From the menu bar, select Audit
> Audit Setup > Audit Result Approval Rules.
- Click the NEW button.
- Enter a Rule Name and an optional description.
- Click CONTINUE. A page very similar to the Automated Feedback Rules
pages appears. Rules are set up in much the same manner.
DEFINING THE CONDITIONS OF THE RULE
Management and Locations
- Click ADD.

- Select the Management and Locations to include. You may select
entire management levels, or any number of individual locations.
- Click SAVE & RETURN.
Audit Forms
You can specify the audit forms in two different ways:
- You can select ONLY from the drop-down list, then click the ADD
link to specify the audit forms individually.

- You can select ALL, then click the EXCLUDE link to exclude any
forms that you don't want to include.
The method you use will depend on how many of the existing audit forms
you want to include.
- Select ALL or ONLY from the Audit Forms drop-down list.
- Click the ADD or EXCLUDE link. A list of all forms is displayed.
- Select the audit forms that you want to include, then click the
ADD button.
Auditors
- Select ALL or ONLY from the Auditors drop-down list.
- Click the ADD or EXCLUDE link. A list of all auditors is displayed.
- Select the auditor that you want to ADD or EXCLUDE. The selected
auditor appears in the Auditor section of the rule.

You may continue to add or exclude auditors, but you may only add or
exclude one at a time.
Audit Types
- Select ALL or ONLY from the Audit Types drop-down list.
- ADD or EXCLUDE audit types, as required.
Read
Receipt
A Read Receipt can be sent to a designated person to let them know when
the message was read by the specified recipients of the rule. Keep in
mind that only one person per rule can be designated to receive a Read
Receipt.
When a rule recipient receives an email that results are awaiting approval,
a message will be displayed informing them that a Read Receipt has been
requested. If the user responds with a YES reply, then a Read Receipt
is sent to the designated Read Receipt recipient. You may want to instruct
your users to always respond with a YES reply when asked if they want
to send a read receipt. Otherwise, no Read Receipt will be sent.
To specify a recipient of the Read Receipt:
- Click the READ RECEIPT RECIPIENT - EDIT link.

- Enter the email address of the person who will receive all Read
Receipts for this feedback rule.

- Click SAVE. The name of the designated Read Receipt recipient appears
in the EMAIL field.

SETTING UP THE FEEDBACK MESSAGE
Recipient
- Click the Recipients - ADD link. The Add Subject screen opens.

- Select either EMAIL or FAX from the FEEDBACK METHOD drop-down list.
- Add the SUBJECT of the message. Note that you use replacement
tags in the Subject line of the message.
- Click CONTINUE to continue setting up the feedback message.
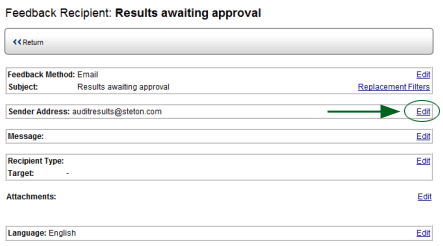
- Click the Sender Address - EDIT link, and enter the email address
of the person to whom all email replies to this message are sent.

If this field is left blank, reply email for all messages
will be sent to the email address specified in the EMAIL ADDRESS INDICATING
SENDER FOR AUTOMATED FEEDBACK field on the Prompts
page of System > System Setup > Implementation Configuration.
- Click SAVE & RETURN.
- Click the Message - EDIT link to open the Message screen. You may
include replacement tags
in the Subject body of the message.
- Select MESSAGE from the Message Type drop-down list, then enter
the text of the message.
- Click SAVE & RETURN.
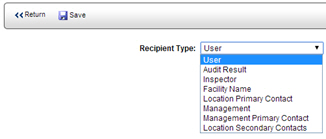
- Click the Recipient Type - EDIT link.
- Select the RECIPIENT TYPE from the
drop-down list:

 |
Be sure that a valid email address exists
for the specified recipient type. If no email address exists,
then the message cannot be sent. |
- USER - The message will be sent to the email address associated
with the user you specify.
- AUDIT RESULT - The message will be sent to the email specified
at the time the audit was approved.
- AUDITOR - The message will be sent to the email or fax associated
with the auditor who conducted the audit.
- LOCATION - The message will be sent to the email address specified
for the location where the audit was conducted.
- LOCATION PRIMARY CONTACT - The message will be sent to the
specified email address of the person designated as the primary
contact for the location where the audit was conducted.
- MANAGEMENT - The message will be sent to the email associated
with the management group to which the location is assigned.
- MANAGEMENT PRIMARY CONTACT - The message will be sent to the
email specified for the person designated as the primary contact
for the management group in which the location resides.
- LOCATION SECONDARY CONTACTS - Feedback will be sent to the
email or fax specified for the person(s) designated as the secondary
contact for the location where the audit was conducted.
- CONTACT GROUP - Feedback will be sent to the specified person(s)
designated in the Contact Group regardless of each person's Relation
Type status. Using Contact Groups is an optional feature. See
Creating a Contact Group.
- Click SAVE. If you selected USER as recipient type, a list of users
is displayed. Select the user to whom you want the message sent. NOTE:
Be sure an email or fax number exists for the user you select.
- Click RETURN.
- Click RETURN again to return to the list of Approval Rules.
 |
Make sure that the user who needs to approve
the results has been given the appropriate RESULT APPROVAL permissions
(for approving and modifying the results), as well as the RESULTS
- VIEW ALL permission. |
| APPROVING
AND SUBMITTING RESULTS |
Once audit results are uploaded from Mobile Auditor and validated, rules
are checked to determine if results need to be held and approved prior
to submitting them. If all of the conditions specified in the rule are
met, feedback is sent to the person designated in the rule. That individual
will need to review the results, make any changes that may be necessary,
and then submit the results.
- Select APPROVE AUDIT RESULTS from the Audit menu. A list of all
results awaiting approval is displayed.
- Select the result from the list. The results open in a window very
similar to the Audit
Maintenance Tool feedback report window. The results are edited
in the same manner.
 |
If you have the APPROVE ALL AUDITS permission
and you want to approve multiple results at one time using
a batch approval process, check the box to the left of the
results you want to approve, then click the APPROVE RESULTS
button. If you don't have this permission, the APPROVE RESULTS
button will not be available. |

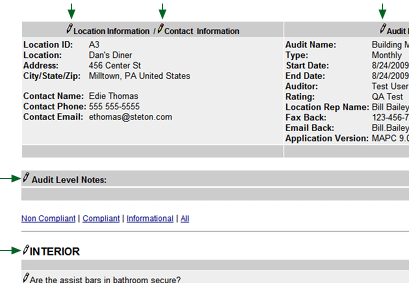
- An Edit pencil appears beside all editable data. Click the Edit
pencil beside the data that you want to edit.

- Make the necessary changes.
- Click SAVE & RETURN.
- When you're finished making changes, click the APPROVE button at
the top of the window.
- Results are submitted and are now available in reports.
You can view the audit results now by selecting VIEW AUDIT RESULTS in
the audit menu.

ref:
ApproveResult


