
A rule basically defines whether or not an action plan gets created based on defined criteria.

All parameters defined in a rule can be edited prior to any audits. Once you run audits against a rule and it triggers a corrective action plan, you can no longer edit the steps or create new steps that would change the current rule's approval process. Rather, you will need to create a copy of the rule and make the changes in the new rule. |
There are several steps to creating a rule:
Go
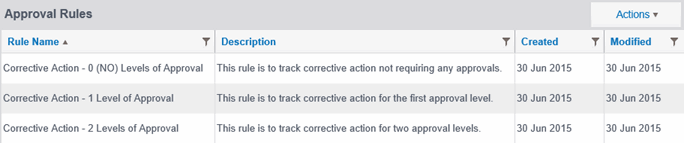
to Action Plans > Rules.
The Approval Rules screen displays.
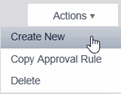
From
the Actions droplist, select Create New.
The Create New pane displays.
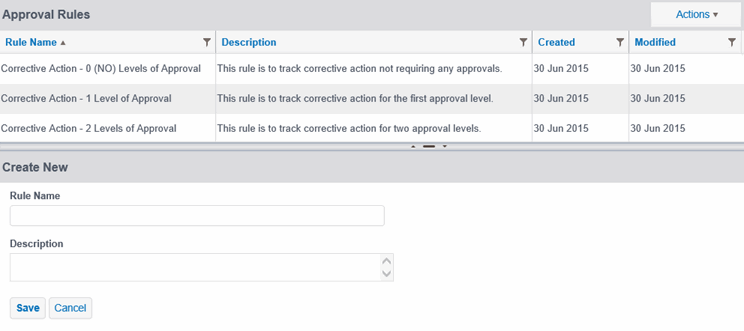
Enter
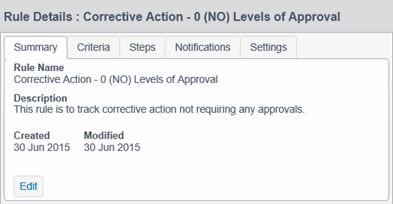
the rule name (required) and description (optional), then click SAVE.
The Rule Details pane displays.
To define the criteria used for a new rule:
Select the Criteria tab.
The Criteria tab displays as shown.
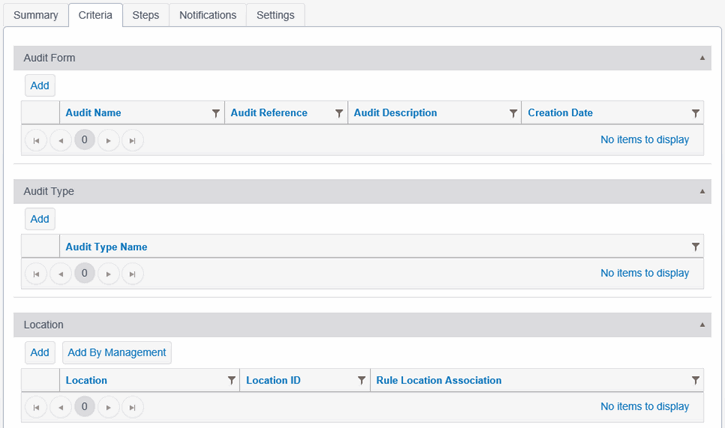
When defining the criteria, the following are some general guidelines:
|
Under
the Audit Form category, click ADD.
The Add Audit Forms dialog displays.
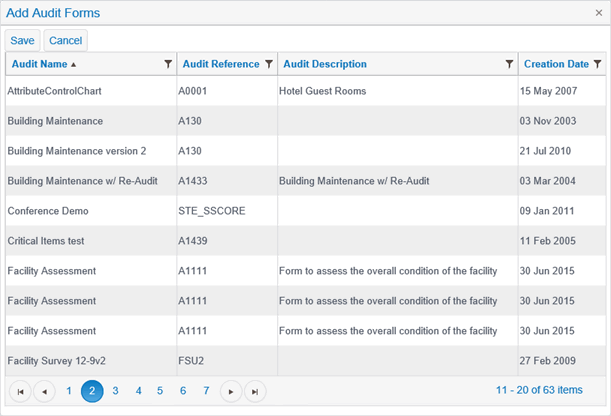
Select the form(s) you want to add to the rule.
| To select multiple forms, hold down the CTRL key while clicking on each form you want to select. |
Click SAVE.
Under
the Audit Type category, click ADD.
The Add Audit Type dialog displays.
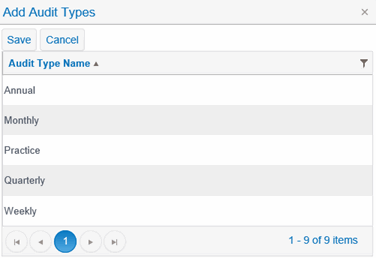
Select the audit type(s) you want to add to the rule.
| To select multiple forms, hold down the CTRL key while clicking on each form you want to select. |
Click SAVE.
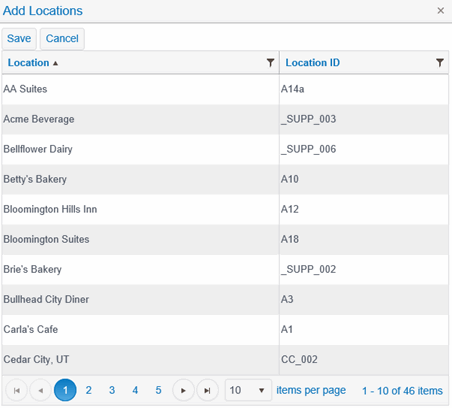
Under
the Location category, click ADD or
ADD BY MANAGEMENT.
If you clicked ADD, the Add Locations dialog box displays allowing
you to add by locations.
-OR-
If you clicked ADD BY MANAGEMENT, you will see the Add By Management
dialog allowing you to add locations by hierarchical management level.
If locations are added using this method and the locations assigned
to that Management change (a location added or removed), then the
locations included in the criteria will also update to reflect the
modification.
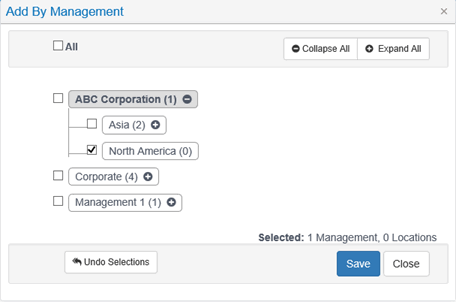
Select
the locations you want to apply to the rule, then click SAVE.
To create approval steps in a rule:
| Step creation is only needed if the action plans generated by the rule will be required to go through an Action Plan Approval process. If you do not have the CAM Approval process enabled, the Steps tab will not display. If you do not intend to use the Action Plan Approval process, then you can skip this step when configuring a rule. |
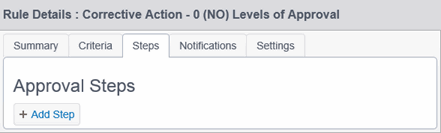
Select
the Steps tab.
The Steps tab displays.
| If the ADD STEP button is not displayed, it means you have already run audits against this rule and you can no longer modify the steps in this rule. You will need to create a copy of this rule and create a new rule from the copy. |
Click ADD STEP.
The Approval Steps displays.
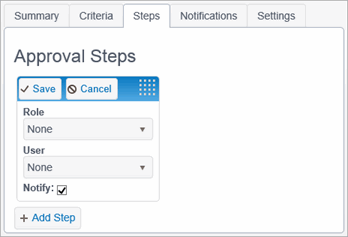
The Role
and User fields are optional, but at least one of the fields
must have a selected value. As a recommended practice, using
a role is the best option since the User(s) assigned to the
Role may be edited at any time as needed. You may choose
to have:
|
From the Role droplist, select the role to which you want to assign approval responsibility.
From the User droplist, select the user to which you want to assign approval responsibility.
If you want the step's assigned approvers to be notified when they have an action plan to review, mark the Notify checkbox.
Click SAVE.
If you want to have multiple levels
of approval triggered by this rule, click ADD STEP to continue to
add additional approval levels.
Once entered, your Approval Steps may look similar to the example below.
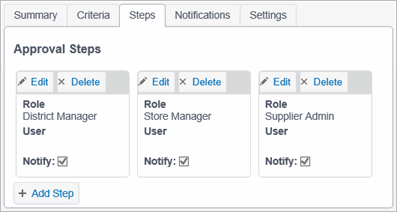
In the above example, when an action plan that is associated with the
rule has been submitted for approval, it will be placed in the Approval
queue for each user assigned to the District Manager role. Only
users assigned to this role will be able to see this corrective action
plan at approval level 1. The same is true of the second level,
only users assigned to the Store Manager role will be able to see
this corrective action plan at approval level 2. Level 3 corrective
action plan approvals will only be visible by users assigned to the
Supplier Admin role. If we had added a specific user to one
of the steps as well, then the role and the user would have access
to review and approve the action plan.
If you want to reorder the steps
in this section, click and hold the Drag-and-drop button in the right
corner of the Approval Step, then drag the step left or right to the
desired location, release, and then click SAVE.

| Reordering the steps in the rule can be done up until audits have been run against the rule resulting in generated action plans. |
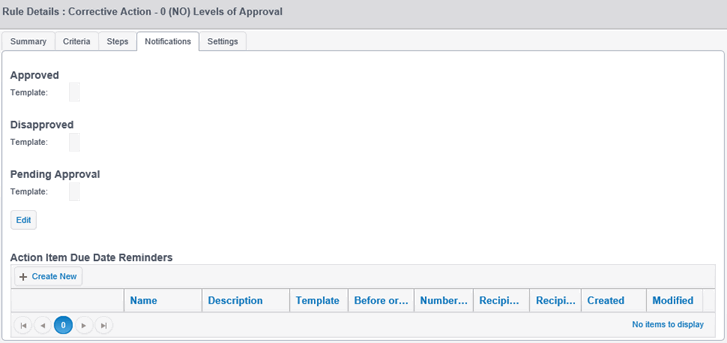
To define action plan rule notifications:
Select
the Notifications tab.
The Notifications tab displays.
| The Notifications
templates referenced on this tab will define the template
for the correspondence text sent out with each notification.
In order for a template to be listed and available to select
on the Notification tab, the template must have a Template
Type of "CAM". It is also highly recommended
that the name of the template adequately describe the nature
of the message and the purpose of the template.
For more information on creating and editing correspondence templates, see Templates. See also: Using Replacement Tags, and Corrective Action Management (CAM) Replacement Tags. |
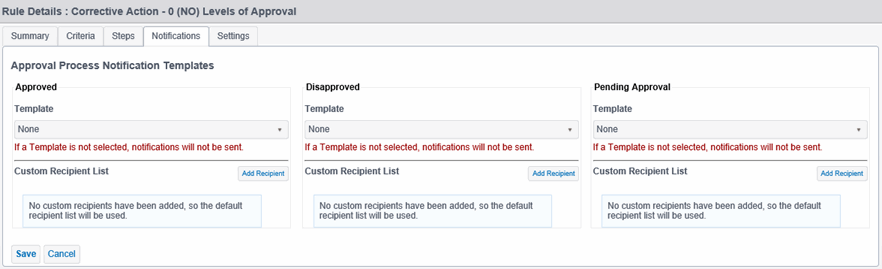
Click EDIT.
Select the correspondence template
you want used for an Approval, Disapproval, and Pending Approval notification
type.
The selections in this tab will trigger the specified template to use
to notify the current step's approver. See the Steps
tab.
If you wish to send recipient notifications to users or groups that
are not set up to be notified through the Roles associated with the
Approval steps, you can add them to the template notification on this
tab.
For the Approved, Disapproved and
Pending Approval templates, click Add Recipients.
The Add Recipient dialog displays.
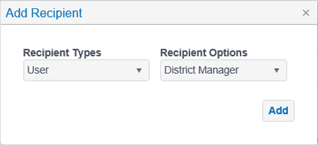
Available Recipient Types are as follows:
|
From the drop-lists, select Recipient
Types and Recipient Options, then click ADD.
The templates and recipient types will display.
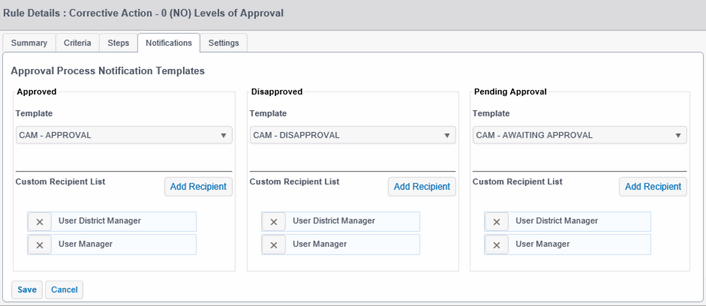
Click SAVE.
The Rule Details screen displays similar to the one shown.
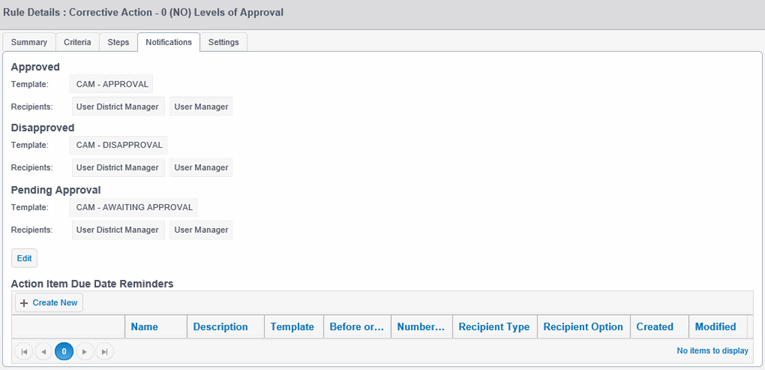
To create due date reminders, click CREATE NEW.
Enter the information in the Due
Date Reminder fields.
In this example, the primary contact will be notified one day after
an action plan due date has been missed. The CAM - OVERDUE template
will be used for this notification.
| Multiple Action Item Reminders can be created for a single rule. For example, an Admin would like a reminder to go out 30 days before an action item's due date, 7 days before the due date, 1 day after the due date, and 7 days after the due date. In this case, three Due Date Reminders would be created. You may also wish to have multiple recipient reminders. In this case, you can create a Due Date Reminder for each recipient. |

The default Action Item Due Date Reminder is set to the location's
primary contact. However, a reminder notification can also be
sent to any associated recipient type contained in the droplist.
Available Recipient Types are as follows:
|
Click UPDATE.
If you are
not receiving notifications, verify:
|
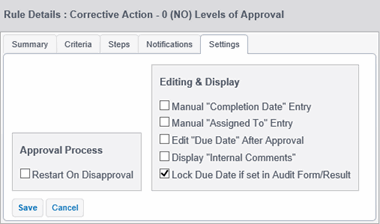
Select
the Settings tab.
The Settings tab displays.
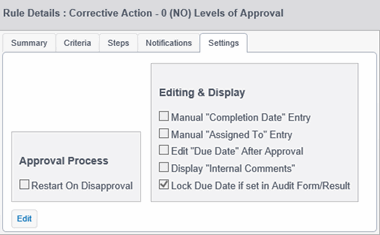
To
modify the settings, click EDIT.
SAVE and CANCEL buttons are displayed in the Setting screen.
SETTING OPTIONS |
DESCRIPTION |
Approval Process: Restart On Disapproval |
If this setting is enabled, a previously disapproved action plan will always enter the approval process at Step 1, when the plan is resubmitted into the approval process. If this setting is not enabled, the resubmitted plan will enter the approval process at the step in which it was last disapproved. |
Editing & Display: Manual "Completion Date" Entry |
The default program setting automatically assigns a completion date for an action item when the User marks the action item as Complete. By enabling this option, a Complete Date field is made available in each action item to allow you to manually enter the completion date for the action item and override the system-assigned, current date. |
Editing & Display: Manual "Assigned To" Entry |
Without this setting enabled, the application only allows the user to select an Assigned To value from the list of Contacts associated with the Plan's location. When this setting is enabled, a regular text box is made available for the Assigned To field into which you can manually enter any value. When manual entry is enabled, you can enter a manual value in the Assigned To field. This is useful if you want to assign it to a preferred group such as "Housekeeping" or "Facilities". When a manual entry is applied, the value entered into this field is not available as a Recipient for any action item reminders (see Notification System for Programs and Action Plan Rule Notifications). |
Editing & Display: Edit "Due Date" After Approval |
Enabling this option allows an admin with the permission (Action Plan: Edit Item Due Date After Approval) to change an Action Item due date after the Action Plan has been approved. |
Editing & Display: Display "Internal Comments" |
Enabling this option displays an additional text field in every Action Item for additional information. Users with the appropriate permission(s) will be able to view and/or edit the contents of this additional Internal Contents field depending on if one or both of the permissions is enabled for the user. This option requires the following permissions to be granted: Action Plan: View Item Internal Comments and Action Plan: Edit Item Internal Comments. |
Editing & Display: Lock Due Date if set in Audit Form/Result |
Enabling the Lock Due Date if set in Audit Form/Result setting locks the date from being changed in an Audit Result, when set by a form or priority. A user with appropriate permissions (Action Plan: Edit Item Due Date When Set from Choice), can disable this lock setting. Once disabled, a user can modify the date on an audit result. This setting is enabled by default. If the user doesn't have the date set through forms or priorities, this setting is invalid whether enabled or disabled in the Settings tab. See Corrective Action Plan Permissions. |
| All of these options can be turned on or off even if a CAM rule is in use. |
See also Approvals, Disapproval Process Restart, Edit a Corrective Action Item, CAM Permissions, and Assigning CAM Permissions.
