Feedback Report Configuration Options

The following configuration options are available for feedback summary
reports:
- CATEGORY SUMMARY - EXPANDABLE CATEGORIES: EXPAND CATEGORIES ON
REPORT LAUNCH - When enabled, categories are expanded by default in
the Category Summary. This option also requires the SHOW
CATEGORY SUMMARY - EXPANDABLE CATEGORY option to be enabled.
- SHOW COLUMN: CATEGORY NAME - adds a column labeled Audit Category
to the Details section of the report, which displays the name of the
audit category.

- SHOW COLUMN: CATEGORY REFERENCE - adds a column labeled Audit Category
ID to the Details section of the report. This displays the Audit Category
ID associated with the audit question.

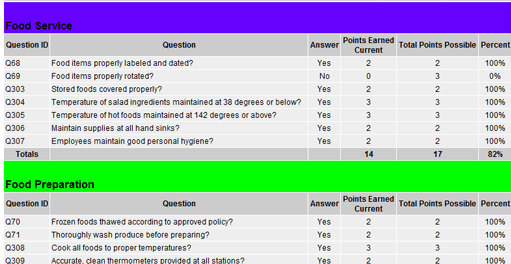
- SHOW COLUMN: QUESTION TEXT - adds a column labeled Questions to
the Details section of the report, which displays the question text.

- SHOW COLUMN: REPORT CATEGORY NAME - adds a column labeled Report
Category to the Details section of the report.

- SHOW COLUMN: REPORT CATEGORY UNIQUE ID - adds a column labeled
Report Category ID to the Details section of the report. This displays
the Report Category associated with the question.

- REPLACE N/A ANSWER TEXT WITH A BLANK VALUE - When enabled, the
point columns will be blank if the question response(s) have no points
or no points possible values - even if other responses have a value.
- DISPLAY ENGAGEMENT DATA FROM TIME AUDIT WAS CONDUCTED INSTEAD OF
CURRENT ENGAGEMENT DATA - When enabled, the report displays the audit
data from the time the audit was conducted. When disabled, the report
displays the current engagement data instead.
- ALLOW HTML FORMATTING IN ANSWER TEXT - When enabled, answer text
may include HTML formatting.
- AUDIT LEVEL NOTES- displays any audit-level notes associated with
this audit.
- SHOW AUDIT RATING SUMMARY - displays the ratings defined for this
audit.

- DISPLAY CATEGORY RATING COLOR ON CATEGORY HEADER - displays the
header of the audit category in the color associated with the rating
the category received.
- SHOW CATEGORY COMMENTS - displays all comments associated with
a category.
- SHOW AUDIT CATEGORY RATING IN CATEGORY SUMMARY - displays the ratings
associated with each audit category and subcategory. This option is
available when Category
Ratings (optional) feature is enabled. The Category Summary option,
below, is also required. Note that if a rating color has been defined,
it is also displayed.

 |
Contact
your RizePoint representative for details on enabling this
feature. |
- DISPLAY CATEGORY RATING TEXT IN CATEGORY HEADER - displays the
rating text for the category in the category header.
- SHOW CATEGORY SUMMARY - displays a list of categories included
in the audit.
- SHOW REPORT CATEGORY SUMMARY - displays the report categories included
in the audit.
- SHOW SCORE IN REPORT CATEGORY SUMMARY - displays a Score column
in the Report Category Summary.
 |
To display
weighted scores,
disable this option to hide the Score column in the Report
Category Summary, then enable both the DISPLAY CATEGORY WEIGHTS
and SHOW SCORE options, which places a Weighted Score column
in the Report Category Summary. Also, the Weighted
Category Scores optional feature must be enabled. |
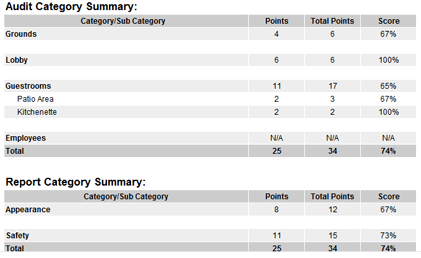
- DISPLAY THE AUDIT/REPORT CATEGORY SUMMARY WITH BOLD CATEGORY NAMES,
INDENTED SUBCATEGORIES, AND ALTERNATING ROW COLORS - formats the Audit/Report
Category Summary in alternating row colors, with the name of each
top-level category in bold font, and with all nested subcategories
indented below.
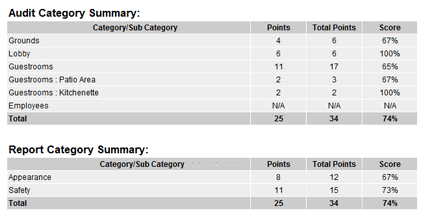
When this option is disabled, the category and all nested subcategories
appear on the same line, separated by a colon, without bold font or
alternating row colors.
- SHOW CATEGORY WEIGHT - displays the weight assigned to the
audit or report category. This option also requires the CATEGORY
SUMMARY or the DETAILS options. In addition, the Weighted
Category Scores optional feature must be enabled.
- SHOW CHOICE SUMMARY - displays a list of all predefined answer
choices (radio and drop-list only).
- DISPLAY QUESTION COMMENTS IN SEPARATE COLUMN - displays comments
in a column to the right of the question. When this option is disabled,
the comments appear below the question.
- SHOW CRITICAL QUESTION SUMMARY - displays all questions that are
tagged as "critical".
- IF CATEGORY DISPLAY IS SET
TO REPORT CATEGORY; SHOW ALL REPORT CATEGORIES - displays all Report
Categories in a feedback report. If enabled, the feedback report will
display all report categories whether or not the report category has
a score associated with it.
- SHOW CATEGORY SUMMARY
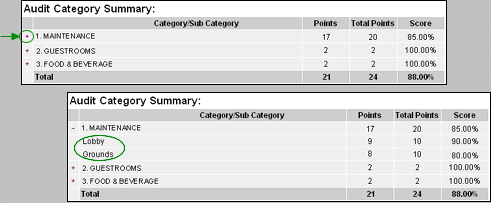
- EXPANDABLE CATEGORY - When this option is enabled, a plus sign (+)
appears to the left of the category name, and clicking the plus sign
expands the list to display the subcategories within.
 |
To display the overall scores of the
parent categories, also enable the SHOW PARENT CATEGORY SCORES
option. |
- SHOW CATEGORY SUMMARY - HIDE EMPTY CATEGORIES - When this option
is enabled, categories that have not been triggered by a question,
or categories that have no associated questions, are not displayed
in the Category Summary.
- SHOW CATEGORY
FILTER - displays the Category Filter SELECT link at the top of the
report. When you click the link, a list of audit categories is displayed.
You can select all audit categories to include, or select a single
audit category to display. This option also requires the DETAILS option.

- SHOW CHOICE FILTER
- displays the CHOICE FILTER drop-list at the top of the report. All
predefined answer choices appear in the list. When used with the SHOW
DETAILS option (required), the report displays only those questions
the received the same answer as the answer choice selected from the
CHOICE FILTER drop-list. (For example, if NO is selected from the
CHOICE FILTER drop-list, then only questions that were answered NO
will appear in the report.) To specify the default choice (the choice
initially displayed when the report first opens), see Specifying
which Filters to Use when setting up the feedback report for an
audit form. If you want users to be able to select more than one answer
choice at a time, also enable the ALLOW MULTIPLE CHOICE FILTERS option,
below.

- ALLOW
MULTIPLE CHOICE FILTERS - allows you to filter the report on multiple
answer choices. Users can hold down the CTRL
key to select multiple answer choices from the Choice Filter droplist,
then click the green arrow to run the report with the selected choices.

- SHOW COMPLIANCE
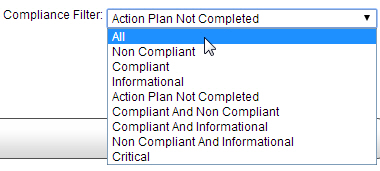
FILTER - displays the Compliance Filter drop-list at the top of the
report. Users may choose to display all questions, only informational
questions, or only those questions that received compliant, non-compliant,
or answers designated as critical or informational (or combinations
of the above choices). This option also requires the DETAILS option
to be enabled.
- SHOW QUESTION
FILTER - displays a Question Filter SELECT link at the top of the
report. Clicking the link displays a list of all questions, allowing
users to specify which questions to include in the report.

- SHOW REPORT
CATEGORY FILTER - displays a Report Category SELECT link at the top
of the report. All report categories appear in the list. This option
also requires the DETAILS option.

- SHOW FOOTER - displays a footer at the bottom of the page, which
may include the text that appears in the ADDRESS LABEL, CONFIDENTIAL
LABEL, or PHONE LABEL fields, below.
- DISPLAY OVERALL SCORE AND RATING AT THE TOP - displays the overall
score and rating at the top of the report, just below the header and
any user-defined fields that may also appear at the top of the report.
- DISPLAY ONLY ROOT-LEVEL CATEGORIES IN THE CATEGORY SUMMARY - displays
only the top level categories (no sub-categories are displayed).
- SHOW POINTS EARNED - displays the points earned in each category
(requires the CATEGORY SUMMARY option) or the points earned for each
question (requires the SHOW DETAILS option.)
- SHOW POINTS POSSIBLE - displays the total points possible for the
category (requires CATEGORY SUMMARY option), answer choice (requires
CHOICE SUMMARY option), or question (required DETAILS option).
- SHOW QUESTION COMMENTS - displays all comments associated with
questions.
- SHOW QUESTION REFERENCE - displays the question reference ID for
each question when the DETAILS option (required) is also selected.
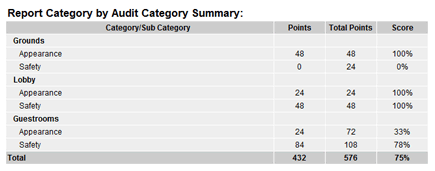
- SHOW REPORT CATEGORY BY AUDIT CATEGORY SUMMARY BOX - displays a
Report Category Summary, broken down by audit category, directly below
the Category Summary.
- SHOW DETAILS - displays questions and selected answer choices.
- SHOW SCORE - displays the score received for this audit.
- SEPARATE TOP LEVEL CATEGORIES - When enabled, this option places
a horizontal
line directly above and below top level categories.
This option is useful when categories contain multiple levels of subcategories,
and makes it easy to distinguish top level categories from subcategories.
- DISPLAY CATEGORY ON CRITICAL CHOICE SUMMARY - displays the category
in which questions receiving critical answers choices reside.
- SHOW CATEGORY DETAILS HEADER ROW - displays the header row for
the category details.

- SHOW CURRENT DATE- displays the current date in the upper right
corner of the report.
- DISPLAY OVERALL RATING (APPEARS AT THE BOTTOM OF THE REPORT) -
displays the overall rating at the bottom of the report.
- DISPLAY OVERALL SCORE (APPEARS AT THE BOTTOM OF THE REPORT) - displays
the overall score at the bottom of the report.
- DISPLAY OVERALL SCORE AS POINTS OF POINTS POSSIBLE - displays the
overall score in points, rather than as a percentage. The score is
displayed as number of points earned out of number of points possible
(e.g., 83 of 100).
- DISPLAY OVERALL SCORE AS TOTAL POINTS ONLY - This removes the points
possible from the report. Only the points earned during the audit
will display. This option works in conjunction with the DISPLAY OVERALL
SCORE (APPEARS AT THE BOTTOM OF THE REPORT) option.
 |
If you enable the DISPLAY OVERALL SCORE AS
TOTAL POINTS ONLY and
the DISPLAY OVERALL SCORE AS POINTS OF POINTS POSSIBLE together,
the application will default to the DISPLAY OVERALL SCORE
AS POINTS OF POINTS POSSIBLE configuration. |
- SHOW PARENT CATEGORY SCORES - displays subcategory names preceded
by the parent category, then rolls
up all subcategory scores and calculates a percentage
score for each parent category.
- SHOW PREVIOUS AUDIT INFORMATION - displays the date and score
of the previous audit when used in conjunction with the Repeat
Violations optional feature.

- SHOW PRIORITY INFORMATION - displays the priority associated with
each question in a separate column labeled PRIORITY. (Use this option
in conjunction with the Priority
option in the Field Manager.)
- SHOW TIME IN START, END, AND UPLOAD DATE - displays the time the
audit was begun, the time when the audit was completed, and the time
when the results were uploaded.
- SWAP THE NOTES AND ANSWER COLUMNS - switches the position of the
notes and answer columns in the report.
- TREAT TEXT ANSWERS ARE INFORMATION - all text question types are
treated as informational, even though they may have been designated
as either correct or incorrect. Selecting this option allows you to
filter out (or include) text questions in the feedback report.
- TOGGLE THE CATEGORY SUMMARY SCORES ROLLUP
- allows an administrator to easily change the report settings between
rolling up the category summary score, which includes scores from
all subcategories within the parent category, and displaying only
the score of the parent category. Note that if you are NOT rolling
up the score and the parent category has no questions (only questions
inside nested subcategories), then the score will be displayed as
N/A. If the report is not displaying the option you want, simply change
this setting in the report configuration, save it, then run the report
again. Note that this option also requires the SHOW CATEGORY SUMMARY
and SHOW CATEGORY SCORE options.
- DISPLAY TABLE HEADERS WITH A THIN LINE - places a thin
line between sections of the report, replacing
the standard thicker line displayed when this option is disabled.
When used in conjunction with the HEIGHT OF EMPTY HEADER AND FOOTER
BARS (IN PIXELS) and the AMOUNT OF SPACE BETWEEN REPORT SECTIONS,
allows you to reduce the vertical space used in the report. The color
of the thin line is determined by the color specified in HEADER FOOTER
BACKGROUND COLOR. When using this option, avoid using the SHOW POINTS
EARNED, SHOW POINTS POSSIBLE, and SHOW SCORE options, as enabling
these options prevents the thin line from being displayed between
category headings.
- OPEN IN FORMAT: SHOW EXCEL LINK - provides a link that lets you
open the HTML report in an Excel spreadsheet.
- OPEN IN FORMAT: SHOW WORD LINK - provides a link that lets you
open the HTML report in a Word document.
- DISPLAY PAGE NUMBERS ON PDF - displays page numbers in PDF version
of report.
- CATEGORY NOTES BACKGROUND
COLOR - allows you to select a background color for category notes.
Click the COLOR PALETTE icon to display a color picker, or enter the
RGB value, in hexadecimal format (#RRGGBB)
in the text field on the left, then press the TAB key to tab out of
the field. (NOTE: For additional color choices, you may select a different
palette from the droplist in the Color Picker window.)
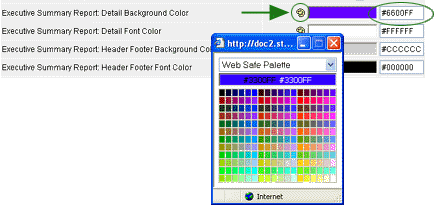
- DETAIL BACKGROUND COLOR - allows you to select a background color
for the report. Click the COLOR PALETTE icon
 to display a color picker.
- DETAIL FONT COLOR - allows you to select a font color for the body
of the report. Click the COLOR PALETTE icon
 to display a color picker.
- HEADER FOOTER BACKGROUND COLOR - allows you to select a background
color for the footer of the report. Click the COLOR PALETTE icon
 to display a color picker.
- HEADER FOOTER FONT COLOR - allows you to select a font color for
the footer area of the report. Click the COLOR PALETTE icon
 to display a color picker.
- RATING BOX TEXT COLOR - allows you to select a color for the ratings
text. Click the COLOR PALETTE icon
 to display a
color picker.
- TITLES FONT COLOR - allows you to
select a font color to use for all titles in the report. Click the
COLOR PALETTE icon
 to display a color picker.
- ADDRESS LABEL - text entered here appears in the lower left corner
of the report. Note that you may include HTML formatting. The width
of this column is limited to 35 characters.

- CONFIDENTIAL LABEL - text entered here appears at the bottom center
of the report. Note that you may include HTML formatting. The width
of this column is limited to 28 characters.
 |
If no text is entered in the Address and
Phone fields, the Confidential message text will be spread
across all three columns (Address, Confidential and Phone).
The maximum width of the Confidential column will then be
186 characters. |
- PHONE LABEL - text entered here appears in the lower right corner
of the report. Note that you may include HTML formatting. The width
of this column is limited to 35 characters.
- REPORT TITLE (leave blank to show form name) - displays the text
entered in this field as the title of the report. If this field is
left blank, the name of the audit form is used as the title of the
report. Note that you may use HTML formatting and replacement tags
in this field.
- CATEGORY SUMMARY LINE WIDTH - This setting determines the amount
of blank space displayed between the rows and columns in the Audit
Category and Report Category Summaries.
- PRE-DEFINED COMMENT CONTAINS-
This option allows you to only include questions if a selected
predefined comment contains the text entered into this field, and
if the answer choice matches the specified default compliance setting.
(This text is not case sensitive.) For an example of how this can
be used, click here.
- HEIGHT OF EMPTY HEADER AND FOOTER BARS (IN PIXELS) - specifies
the amount of space (in pixels) that is left blank when no header
and/or footer has been specified.
- AMOUNT OF SPACE BETWEEN REPORT SECTIONS (IN PIXELS) - specifies
the amount of space (in pixels) that is left blank between each section
of the report.
- CATEGORY DISPLAY FILTER - displays an Audit Category Filter SELECT
link at the top of the report. Clicking the link displays a list of
all categories in the audit, allowing users to specify which categories
to include in the report.
- DEFAULT COMPLIANT SETTING - allows you to specify the default setting
of the Compliant filter.
- DECIMAL PLACE DISPLAY - all values in the report contain this number
of decimal places.
- HISTORICAL DATA: NUMBER OF RESULTS/COLUMNS TO DISPLAY - This is
the number of prior results (up to three) to display when including
historical data in the feedback report. A column is provided for each
prior result. Note that this includes only audits conducted on the
same location, and using only form(s) that have been specified in
the REPEAT FORMS section of the audit form setup options page. When
specifying report forms for a particular audit form, be sure to include
the current form as well.
- HISTORICAL DATA: SHOW COMPLIANT/NON-COMPLIANT STATISTICS ROWS -
displays data from the number of past audits specified in the HISTORICAL
DATA: NUMBER OF RESULTS/COLUMNS TO DISPLAY field, above. Data
from each historical result appears in a separate row.
- HISTORICAL DATA: SHOW CATEGORY TOTAL ROW - displays data from the
number of past audits specified in the HISTORICAL DATA: NUMBER
OF RESULTS/COLUMNS TO DISPLAY field, above, in a separate row
at the bottom of the Category Summary.
- HISTORICAL DATA: SHOW OVERALL STATISTICS SUMMARY - displays data
from the number of past audits specified in the HISTORICAL DATA:
NUMBER OF RESULTS/COLUMNS TO DISPLAY field, above, in a separate
row at the bottom of the report.
- ANSWER TEXT LOCATION - allows you to specify where the answer text
appears in the report. Select LEFT, MIDDLE, or RIGHT from the droplist.
- SHOW COLUMN: ANSWER - displays a column that contains the answer
choice that was selected.
- SHOW AUDITOR SIGNATURE - displays the signature of the person
who conducted the audit.
- PRINT NAME ON AUDITOR
SIGNATURE - displays the name of the person who was designated as
the auditor in Setup screen prior to conducting the audit.

- SHOW LOCATION SIGNATURE - displays the signature of the location
representative who signed the audit when the audit was completed.
- PRINT NAME ON LOCATION SIGNATURE - displays the name of the location
representative specified in the Signature screen when the audit was
signed.

- DISPLAY APPROVED BY - displays the name of the person who approved
the audit. (This option applies to Online audits only.)
- DISPLAY APPROVED DATE - displays the date on which the audit was
approved. (This option applies to Online audits only.)
- DISPLAY CHANGE LOG - displays
a Change Log of changes made to answers with the Audit Maintenance
Tool, which includes the date and time of the change (local time where
the change was made), the question, the previous answer, and who made
the change.

- HEADER LOGO LEFT - If you want a logo to appear in left side of
the header, select the logo from the droplist.
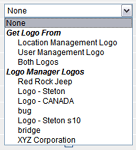
- HEADER LOGO RIGHT - If you want a logo to appear in right side
of the header, select the logo from the droplist.
- FOOTER LOGO LEFT - If you want a logo to appear in left side of
the footer, select the logo from the droplist.
- FOOTER LOGO RIGHT - If you want a logo to appear in right side
of the footer, select the logo from the droplist.
 |
The NEW, EDIT, and DELETE columns are only
visible to users with the appropriate permission. |
- ACTION PLAN ITEM - NEW - provides a column in which a user with
the ACTION PLAN: CREATE permission may create an existing action plan
for the associated question. This column is only visible to users
with this permission.
- ACTION PLAN ITEM - REQUIRE EXISTING ACTION PLANS TO BE FILLED IN
BEFORE ALLOWING ADDITIONAL ACTION PLANS TO BE CREATED FOR A QUESTION
- When this option is enabled, a defined plan of action must be completed
before another action plan can be defined for that question. When
this option is disabled, any number of action plans may be defined
for a question, even though the first action plan has not yet been
defined.
- ACTION PLAN ITEM - EDIT - provides a column in which a user with
the ACTION PLAN: EDIT permission may edit an existing action plan
for the associated question. This column is only visible to users
with this permission. NOTE: Users with the ACTION PLAN: EDIT permission
are able to edit and modify action plans in Feedback Reports. See
Editing
Feedback Report Action Plans.
- ACTION PLAN ITEM - DELETE - provides a column in which a user with
the ACTION PLAN: DELETE permission may delete an existing action plan
for the associated question. This column is only visible to users
with this permission.
- VIEW ROOT CAUSE
- displays the root cause specified for the associated question.
- REQUIRE ROOT CAUSE RESPONSE - requires an entry in the Root Cause
field before saving an Action Plan. If a required field is left blank,
and the user attempts to save the Action Plan, a message is displayed
to notify the user that required fields must be populated before saving.
Note that the VIEW ROOT CAUSE option, above, must also be enabled.
- VIEW ACTION PLAN - displays the action plan specified for the
associated question.
- REQUIRE ACTION PLAN RESPONSE - requires an entry in the Action
Plan field before the action plan can be saved. Attempting to save
before defining a plan of action results in a message notifying user
that required fields must be populated before saving. Note that the
VIEW ACTION PLAN option, above, must also be enabled.
- VIEW PREVENTIVE ACTION PLAN - displays the preventive action
plan specified for the associated question.
- REQUIRE PREVENTIVE ACTION PLAN RESPONSE- requires an entry in the
Preventive Action Plan field before the action plan can be saved.
Attempting to save before defining a preventive plan of action results
in a message notifying user that required fields must be populated
before saving. Note that the VIEW PREVENTIVE ACTION option, above,
must also be enabled.
- VIEW RESPONSIBLE PERSON - displays the name of the person responsible
for completing the corrective action.
- REQUIRE RESPONSIBLE PERSON RESPONSE -
requires an entry in the Responsible Person field before the action
plan can be saved. Attempting to save before specifying a person who
is responsible for correcting the non-compliancy results in an error
message. (Note that there is an optional feature that automatically
provides
a default responsible person for the action plan.) Note that the
VIEW RESPONSIBLE PERSON option, above, must also be enabled.
- VIEW DUE DATE - displays the Due Date field and allows a user with
the ACTION PLAN: EDIT permission to specify the due date for completing
the action plan for the associated question.
- REQUIRE DUE DATE RESPONSE - requires user to specify a due date
for completing the specified plan of action before the action plan
can be saved. Note that the VIEW DUE DATE option, above, must also
be enabled.
- VIEW COMPLETE DATE - displays the Complete Date field and allows
a user with the ACTION PLAN: COMPLETION DATE permission to specify
the date on which an action plan was completed for the associated
question.
- REQUIRE COMPLETE DATE RESPONSE - requires user to specify a Complete
Date before the action plan can be saved. Note that the VIEW COMPLETE
DATE option, above, must also be enabled.
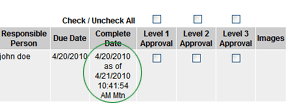
- VIEW MODIFIED DATE/TIME OF "COMPLETE DATE" - When enabled,
both the date selected as the Completed Date, and the date and time
on which the Completed Date was selected, are displayed. When disabled,
only the selected Completed Date appears, regardless of when it was
selected.
- DISABLE ACTION PLAN COMPLETE DATE CLEAR BUTTON - When enabled,
the DELETE (X) button beside the Complete Date field is removed.
- DISABLE ACTION PLAN DUE DATE CLEAR BUTTON - When enabled, both
the CALENDAR button and the DELETE (X) button beside the Due Date
are removed and the specified Due Date cannot be changed.
- DISPLAY ACTION PLAN TEXT & DUE DATE AS READ ONLY FOR CRITICAL
QUESTIONS - When this option is enabled, the action plan text and
due dates of questions designated as "critical" cannot be
edited, even by users with the ACTION PLAN: EDIT permission. (The
default Action Plan text specified will appear here as read-only,
and cannot be changed.)
- VIEW ACTION PLAN IMAGES - displays images that have been uploaded
with an action plan.
- DISABLE ACTION PLAN IMAGE UPLOAD SECTION - When enabled, images
cannot be uploaded to the Action Plan.
- SHOW A SEPARATE ACTION PLAN SECTION AFTER THE DETAILS - (This option
is unrelated to the approval process.) When this option is enabled,
an Action Plan Summary is displayed below the details section of the
audit result.

- ONLY SHOW ACTION PLAN ITEMS FOR NONCOMPLIANT ANSWERS - When this
option is enabled, questions that received compliant and information
answers are still included in the report, but no NEW button is available
for defining an action plan. When this option is disabled, an action
plan can be defined for any question, including those questions that
received compliant and informational answers.
- DISABLE ACTION PLAN HISTORICAL LOG - When enabled, changes can
be made directly to the current action plan. When disabled, a list
of previous edits, and who made them, is displayed. A new action plan
can be specified, but without overwriting previous action plans.
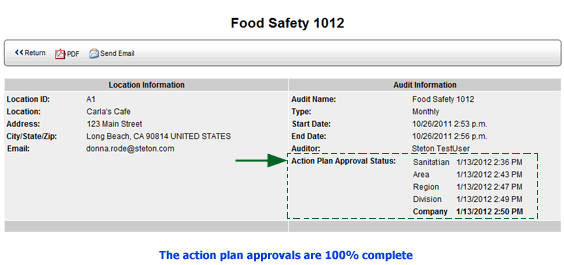
- APPROVAL: VIEW APPROVALS (REQUIRED FOR ALL OTHER APPROVAL OPTIONS
TO WORK)- Selecting this option enables the approval
process. Note that this option must be enabled in order for any
of the following options to apply. If this option is not enabled,
no approval process exists, regardless of the settings of the following
action plan approval options. If this setting is disabled, all settings
below it are irrelevant.
- APPROVAL: VIEW INSTRUCTIONS - When this option is enabled,
instructions appear below the audit information section at the
top of the report. The instructions that are displayed are determined
by the level of user that is logged in. For example, if a Location-level
user is logged in, then Location-level instructions, provided
in the Location Level (bottom level) Instructions field,
are displayed. If a Level 2 user is logged in, then Level 2 instructions,
provided in the Level 2 Instructions field, are displayed.
- APPROVAL: REQUIRE LOCATION TO ENTER AN ACTION PLAN FOR EVERY
NON-COMPLIANT QUESTION - When this option is enabled, each non-compliant
question must have an action plan defined before the location-level
user can submit the results for approval. Note that an Action
Plan is considered to exist if any of
the Action Plan fields have been defined (Action Plan, Root Cause,
Preventative Action, Due Date, Completion Date, or Responsible
Person).
- APPROVAL: EMAIL NOTIFY BUTTONS - Two options are available:
- ONLY SHOW THE PREVIOUS AND NEXT BUTTONS - displays only
the level above and below this level.
- SHOW ALL BUTTONS - displays all levels, as determined by
the setting in the Number of Approval Columns option.
- APPROVAL: POSITION OF NOTIFY BUTTON - allows you to specify
where to display the various notification buttons.
- APPROVAL: PREVENTATIVE ACTION PLAN HEADER LABEL - This is the
label that appears at the top of the Preventative Action Plan
Header Label. Example: Prescribed Plan of Action, Action Plan.
- APPROVAL: ROOT CAUSE ANALYSIS HEADER LABEL - This is the label
that appears at the top of the root level cause column. Example:
Cause of Problem, Root Cause.
- APPROVAL: ACTION PLAN HEADER LABEL - This is the label that
appears at the top of the Action Plan column. Examples: Corrective
Action, Remedy, Action Plan.
- APPROVAL: CHECK/UNCHECK ALL LABEL - At the top of each approval
column, there is a checkbox that allows you to check or uncheck
all approval checkboxes in that column. You can rename the label
that appears with this checkbox. Example: Select/Deselect
All, Select All/None. This label is displayed above
the first category or report category in the body of the report.
It appears when the Approval checkboxes are enabled (available
for checking). Checking this box causes the entire column of checkboxes
to be either checked or unchecked.
- APPROVAL: NUMBER OF APPROVAL COLUMNS TO DISPLAY: This determines
how many levels of approval to include, and provides an approval
checkbox for each level. You many include up to 5 levels of approval.
- APPROVAL: APPROVAL LEVEL 1-5 COLUMN LABELS - Allows you to
specify the label that appears at the top of each column. Note
that regardless of how many labels you enter here, only the number
of columns specified appear in the report. For example, if you
have specified to display three approval columns, then only three
will appear, even though you may have also specified a label for
all five columns. For example, you you're using two levels of
approval, you may want to use the labels Initial Approval
and Final Approval.
- APPROVAL: LOCATION LEVEL (BOTTOM LEVEL) FEEDBACK RULE - Select
the feedback rule that triggers feedback to be sent to the person
designated as the Location-level user. This is the person responsible
for defining the corrective action plans.
- APPROVAL: APPROVAL LEVEL 1-5 FEEDBACK RULE - Specify the feedback
rule that is triggered when sending (submitting) the corrective
action plan to another level (up or down). All feedback rules
that have been defined appear in the droplist. Select the rule
associated with the specific approval level. Remember to always
use a feedback rule that has been specified as Manual Execution.
- APPROVAL: LOCATION LEVEL (BOTTOM) EMAIL/NOTIFY BUTTON LABEL
- If feedback has been specified, then clicking this button moves
the action plan to the Level 1 in the approval process and sends
feedback.
- APPROVAL: APPROVAL LEVEL 1-5 EMAIL/NOTIFY BUTTON LABEL - If
feedback has been specified, then clicking this button moves the
action plan to the next level of approval and sends feedback.
- APPROVAL: SAVE/SUBMIT BUTTON LABEL (WHEN NOT SENDING EMAIL)
- Clicking this button moves the action plan to the next level
of approval.
- APPROVAL: LOCATION LEVEL (BOTTOM) - INSTRUCTION TEXT - These
are the instructions provided to the location-level user for completing
the action plan. (Also requires the View Instructions
option.)
- APPROVAL: APPROVAL LEVEL 1 thru 5 - INSTRUCTION TEXT - These
are the instructions provided for each level of the approval process.
(Also requires the View Instructions option.)
- APPROVAL: APPROVALS - COMPLETE MESSAGE - After all approvals
have been completed, this is the message that displays the next
time the report is viewed.

- APPROVAL: ALLOW LOCATION LEVEL APPROVAL/VERIFICATION, AFTER
MANAGEMENT HAS APPROVED - This option allows the location-level
user to verify (view) the Action Plan after it has gone through
the entire approval process.
- APPROVAL: LOCATION LEVEL APPROVAL/VERIFICATION - FEEDBACK RULE
- Select the feedback rule that sends feedback to the location-level
user to inform him/her that the approval action plan is ready
to view/verify.
- APPROVAL: LOCATION LEVEL APPROVAL/VERIFICATION - EMAIL/NOTIFY
BUTTON LABEL - This is the label on the button that the location-level
user clicks to "verify" the approved action plan.
- APPROVAL: LOCATION LEVEL APPROVAL/VERIFICATION - INSTRUCTION
TEXT - These are the instructions that are provided to the location-level
user for verifying the approved action plan.
- APPROVAL LEVEL 1-5 APPROVE/VERIFY AND CLOSE AUTHORITY - When
this option is enabled, an intermediate approval-level user may
"approve and close" the action plan, without needing
to go to all approval levels above.
- APPROVAL: APPROVE/VERIFY AND CLOSE AUTHORITY - BUTTON LABEL
- This is the label that appears on the button that an intermediate
approval-level user clicks to "approve and close" the
action plan.
- APPROVAL:
SHOW ACTION PLAN APPROVAL DATES IN DETAIL - When enabled, the
date and time the item was approved are displayed below the checkbox.
If an item is unchecked, then checked again, the updated date
and time are displayed.

Enter any additional information in
the User-defined fields. Note that these fields support the use of replacement
tags. User Defined Values 1, 2, and 3 appear at the top of the report,
just below the header information. User Defined Values 4 and 5 appear
at the bottom of the report, just above the Signature fields. Note that
you may edit the label of
the user-defined field from the feedback report later.
- USER DEFINED VALUE 1
- USER DEFINED VALUE 2
- USER DEFINED VALUE 3
- USER DEFINED VALUE 4
- USER DEFINED VALUE 5
| HEADER:
LOCATION INFORMATION DISPLAY |
Select the location
information that you want to include in the header section at the top
of the report:
- DISPLAY LOCATION ID
- DISPLAY LOCATION NAME
- DISPLAY LOCATION ADDRESS 1
- DISPLAY LOCATION ADDRESS 2
- DISPLAY LOCATION MAILSTOP
- DISPLAY LOCATION CITY, STATE, POSTAL CODE AND COUNTRY
- DISPLAY LOCATION EMAIL
- DISPLAY PHONE 1
- DISPLAY PHONE 2
- DISPLAY LOCATION FAX
- DISPLAY PRIMARY CONTACT NAME
- DISPLAY PRIMARY CONTACT EMAIL
- DISPLAY PRIMARY CONTACT PHONE
- DISPLAY PRIMARY CONTACT FAX
| HEADER:
AUDIT INFORMATION DISPLAY |
Select the audit
information that you want to include in the header section at the top
of the report:
| HEADER:
OTHER INFORMATION DISPLAY |
Select the any other information that
you want to include in the header section at the top of the report:
- DISPLAY MANAGEMENT ID
- DISPLAY MANAGEMENT NAME
- SHOW LOCATION USER FIELDS 1 - 10
 |
Graphs and Tables are only available if
the necessary queries have been added to your implementation of
RizePoint; otherwise, these fields are greyed out and unavailable.
See ADDING
TABLES AND GRAPHS TO A FEEDBACK REPORT for more information.
Contact RizePoint for details. |
- SHOW GRAPH (1 through 4) - When available, selecting this option
displays a graph in the report.

- GRAPH LEGEND - displays a legend on the graph.
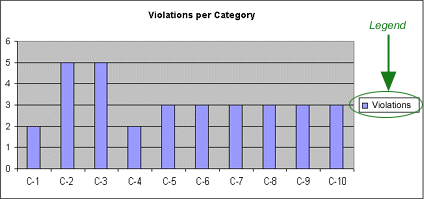
- GRAPH LEGEND LOCATION - allows you to specify the location of the
legend.
- GRAPH CHART TYPE - allows you to select the type of chart to display.
(NOTE: Make sure that the data included in
the report is suited to the particular type of graph you are using.)
- GRAPH ROWS OR COLUMNS - allows you to specify whether to base the
graph on rows or on columns. (Note: If you don't get the expected
results, try switching this setting.)

- SHOW TABLE (1 through 4) - When available, selecting this option
displays a table in the report.

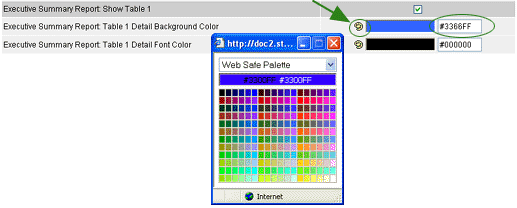
- TABLE DETAIL BACKGROUND COLOR - allows you to specify the background
color of the body of the table. Click the Color Palette icon to display
a color picker, or enter the RGB value, in hexadecimal format (#RRGGBB) in the text field on the left, then press
the TAB key to tab out of the field. (NOTE: For additional color choices,
you may select a different palette from the droplist in the Color
Picker window.)
- TABLE DETAIL FONT COLOR - allows you to specify the font color
of the text that appears in the body of the table. Click the Color
Palette
 to display the color picker,
or enter an RGB value in the text field.
- TABLE HEADER BACKGROUND COLOR - allows you to specify the background
color of the header area of the table. Click the Color Palette
 to display the color picker, or enter an RGB value in
the text field.
- TABLE HEADER FONT COLOR- allows you to specify the font color of
the text that appears in the header area of the table. Click the Color
Palette
 to display the color picker,
or enter an RGB value in the text field.
You may specify an alternate label for
any of the following fields. The alternate labels specified below will
replace the default labels in this feedback report only. If no alternate
label is specified, the global label is displayed by default.
- OVERALL SCORE
- POINTS (This is the column labeled Points
Possible.)
- POINTS EARNED
- CURRENT
- LOCATION ID
- LOCATION NAME
- LOCATION ADDRESS 1
- LOCATION ADDRESS 2
- LOCATION CITY/STATE/ZIP
- AUDIT FORM NAME
- AUDIT TYPE
- AUDIT START DATE/TIME
- AUDIT END DATE/TIME
- AUDITOR NAME
- AUDIT RATING LEVEL
- AUDIT RATING LEVEL LEGEND
- AUDIT CATEGORY SUMMARY
- REPORT CATEGORY SUMMARY
- REPORT CATEGORY SUMMARY POINTS
- PREVIOUS SCORE CATEGORY SUMMARY
- SCORE DIFFERENCE CATEGORY SUMMARY
- PREVIOUS SCORE REPORT CATEGORY SUMMARY
- SCORE DIFFERENCE REPORT CATEGORY SUMMARY
- CRITICAL QUESTION SUMMARY
- AUDIT LEVEL NOTES
- AUDITOR SIGNATURE
- LOCATION SIGNATURE
- QUESTION TEXT
- ANSWER
- POLICY


