Creating Automated Feedback

Setting up Automated Feedback requires the following steps:
 |
The automated
feedback processor is designed to retrieve the HTML data from
the loaded page. For customized reports, the RizePoint system
allows an API connection that may use a script, to render parts
of the report summary when a page loads. In this instance, when
an automated feedback rule is used to generate and email the customized
report, it will not include the portion that is generated by executing
API scripts. To work around this, enable the AbcPdfEnableScripting permission,
then have the feedback rule generate the email with a PDF attachment.
Enabling this permission notifies the feedback processor to execute
the API scripts when rendering a PDF attachment, then it attaches
the PDF file to the automated feedback email. |
CREATING
A NEW RULE
- Log on as a user with both AUTOMATED FEEDBACK ADMINISTRATION permission.
- Go to System > Correspondence
> Automated Feedback Rules.
- Click NEW.

- In the New Feedback Rule screen, enter a name for the rule. You
may also add an optional description.
- Check the MANUAL
EXECUTION CHECKBOX if you don't want the feedback report to be sent
automatically. This option will set up the email/fax notification,
but it won't be sent automatically. It will appear in the feedback
log, but with "0" attempted deliveries. When you're ready
to send the email, you'll need to go to the feedback
log and click the email link to send the email.
- The DAILY NOTIFICATION FOR LEVEL droplist is for use with the Action
Plan approval process. Its use requires custom setup by RizePoint.
See Approval
Process for more information.
- Check the BATCH checkbox if you
want to wait until a specified number of audit results have accumulated
OR until a specified amount of time has elapsed, and then send them
all at the same time. When this box is checked, two additional fields
become available:
- WAIT TIME - Enter the number of minutes that you want to wait
until feedback is sent. When the wait time has elapsed, the feedback
will be triggered for all audit results that have accumulated.
(NOTE: Minimum WAIT TIME is zero minutes; maximum WAIT TIME is
999,999 minutes, or approximately two years.)
- BATCH COUNT - Enter the number of audit results you want to
accumulate before sending the feedback. Entering "1"
in this field sends feedback immediately after one audit result
has been processed, OR after the Wait Time has expired, without
waiting for other audit results to accumulate. Entering a zero
or leaving the field blank also sends feedback immediately, without
waiting for other results to accumulate.
|
If values are entered in both of
the above fields, the condition that is met first is the
prevailing condition. For example, if you enter a "1"
in the BATCH COUNT field, and enter "7 DAYS"
in the WAIT TIME field, feedback will always be sent immediately
after one result, as that condition will always be met
first. However, if you enter "10" in the BATCH
COUNT field, and "7 DAYS" in the WAIT TIME field,
and only one audit result meets the specified conditions
during a seven-day period, then feedback would be sent
after seven days, as that condition would be met first. |
 |
Automated
Feedback is always sent to the person who is specified
as the recipient at the time the audit results are uploaded.
If, for example, the specified recipient is the primary
contact associated with a location at the time the audit
results are uploaded, that person may no longer be the
primary contact when the feedback is actually sent (when
the Wait Time expires or when the number in the Batch
Count field is reached). Keep this in mind when using
either the Wait Time or the Batch Count options. See note
below to prevent email from being sent to inactive
users. |
- Click CONTINUE.
|
If you're using
the Corrective
Action Planning* feature (optional):
- Be sure the BATCH checkbox is checked.
- Specify the proper amount of time, in minutes, in the
WAIT TIME field. For example, if you want to allow one
week to complete the action plan, then enter 10080 in
this field. (There are 10,080 minutes in one week: 60
minutes x 24 hours = 1440 minutes in a day x 7 days =
10,080 minutes.)
- Enter a "1" in the BATCH COUNT field so that
email will be sent as soon as the WAIT TIME has expired.
- Select the ACTION PLAN COMPLETION condition, described
below.
|
DEFINING
THE CONDITIONS OF THE RULE
Specific conditions must be defined for each feedback rule. All
of the conditions specified must be met before feedback is sent.

Management and Locations
- Click ADD.

- Select the Management and Locations to include. You may select
entire management levels, or any number of individual locations.
- Click SAVE & RETURN.
Audit Forms
You can specify the audit forms in three different ways:
- You can select ONLY from the drop-down list, then click the ADD
link to specify the audit forms individually.

- You can select ALL, then click the EXCLUDE link to exclude any
forms that you don't want to include.
- You can use the search filter at the top of the list to search
by the AUDIT ID, AUDIT NAME, or by DESCRIPTION. See Adding
an Audit Form to an Automated Feedback Rule Using the Search Filter.

The method you use will depend on how many of the existing audit forms
you want to include.
- Select ALL or ONLY from the Audit Forms drop-down list.
- Click the ADD or EXCLUDE link. A list of all forms is displayed.
- Select the audit forms that you want to include, then click the
ADD button.
- Notice that a RATING LEVELS column now appears. (NOTE: The CONSTRAINTS*
column is optional - It allows you to specify feedback rules based
on answers to specific questions.)

The setting in the RATINGS LEVELS column defaults to ALL.
- To change the RATING LEVELS setting, select the audit form. (You
may click on the Audit ID, the Audit Name, or the Rating Levels link
to select the form.)
- Select an option from the drop-down list.
- Click SAVE & RETURN.
You may only ADD or EXCLUDE one audit form at a time, but you may ADD
or EXCLUDE as many audit forms as you want.
Adding an Audit Form
to an Automated Feedback Rule Using the Search Filter
- From the menu bar, select System
> Correspondence > Automated Feedback Rules.
- Select an Automated Feedback Rule from the list.
- Navigate to AUDIT FORMS and select ADD.

- Navigate to the filter above the list of audit forms and
select which filter you will use:
- Audit ID
- Audit Name
- Description

5. Enter your search description in the filter field and click
APPLY FILTER. All of the audit forms that match the search description
will display.

6. Click the check box next to each audit form to be associated with
the automated feedback rule.

|
Clicking the
check box at the top of the column will automatically select/deselect
all audit forms.

|
7. Click ADD. The audit forms associated with the automated feedback
rule will be displayed.

To
add constraints based on answers to specific questions:
(requires Feedback
Constraints option)
- Click the CONSTRAINTS link.
- Click the Questions - ADD link.

- You can search for questions in two different ways:
- Search by KEYWORD - Select QUESTION TEXT or the QUESTION ID
from the Search drop-down list, then enter the text on which to
search, and click the SUBMIT QUERY button. All questions that
match the search criteria are listed.

- Search by CATEGORY - Select a category from the CATEGORY drop-down
list. All questions in the selected category are listed.
- Select the question.
- Select a Constraint Criteria:
- NON-COMPLIANT - Add/exclude this question only if a non-compliant
answer was selected.
- COMPLIANT - Add/exclude this question only if a compliant answer
was selected.
- CHOICE SELECTION - Add/exclude this question only if the specified
answer choice was selected. When you select this option, all answer
choices associated with the specified question appear in a list.
Select an answer choice.

- Click SAVE & RETURN.
- Click RETURN to return to the Feedback Rule screen.
When you return to this screen, the number of Constraints appears in
the CONSTRAINTS column. You may add as many constraints as you wish, but
you can only add one at a time.
You may only ADD or EXCLUDE one audit form at a time, but you may ADD
or EXCLUDE as many audit forms as you want.
Auditors
- Select ALL or ONLY from the Auditors drop-down list.
- Click the ADD or EXCLUDE link. A list of all auditors is displayed.
- Select the auditor that you want to ADD or EXCLUDE. The selected
auditor appears in the Auditor section of the feedback rule.

You may continue to add or exclude auditors, but you may only add or
exclude one at a time.
Audit Types
- Select ALL or ONLY from the Audit Types drop-down list.
- ADD or EXCLUDE audit types, as required.
|
Be sure that
any audit types you want to include here have the ability to generate
feedback. If the audit type has not been configured in Audit > Audit Setup > Audit
Types to generate feedback, no audits conducted with
this audit type will generate automated feedback, even though
rules have been previously defined. (See Audit
Types.)
 |
Read Receipt
A Read Receipt can be sent to a designated person to let them know when
the Automated Feedback message was read by the specified recipients of
the feedback rule. Keep in mind that only one person per automated feedback
rule can be designated to receive a Read Receipt.
When a feedback rule recipient receives automated feedback, a message
will be displayed informing them that a Read Receipt has been requested.
If the user responds with a YES reply, then a Read Receipt is sent to
the designated Read Receipt recipient. You may want to instruct your users
to always respond with a YES reply when asked if they want to send a read
receipt. Otherwise, no Read Receipt will be sent.
To specify a recipient of the Read Receipt:
- Click the READ RECEIPT RECIPIENT - EDIT link.

- Enter the email address of the person who will receive all Read
Receipts for this feedback rule.
- Click SAVE. The name of the designated Read Receipt recipient appears
in the EMAIL field.

Conditions
Select ACTION PLAN COMPLETION checkbox to generate automated feedback
if the Action Plan has not been completed by the time indicated in the
BATCH - WAIT TIME field. (To be considered complete, a Completion
Date must be specified for each incorrect/non-compliant item in the Action
Plan.)

SETTING
UP THE FEEDBACK MESSAGE
Recipient
- Click the Recipients - ADD link. The Add Recipient screen opens.
- Select either EMAIL or FAX* from the FEEDBACK METHOD drop-down
list.
- Add the SUBJECT of the message. You may include replacement
tags in the subject line.
- Click CONTINUE to continue setting up the feedback message.
- Click the Sender Address - EDIT link, and enter the email address
of the person to whom all email replies to this automated feedback
message are sent.
If this field is left blank, reply email for all automated
feedback messages will be sent to the email address specified
in the EMAIL ADDRESS INDICATING SENDER FOR AUTOMATED FEEDBACK field
on the Prompts
page of System > System Setup > Implementation Configuration.
- Click SAVE & RETURN.
- Click the Message - EDIT link to open the Message screen. You may
include replacement tags in the
body of the message.
- Select a Message Type from the drop-down list:
- TEXT MESSAGE - If you want the email/fax to contain a text
message, select TEXT MESSAGE and then enter the text into the
Message field. Then, you may also attach the feedback report to
the email. (See Adding Attachments to Feedback, below.)
When this option is selection, neither signatures nor images are
included.
- FEEDBACK REPORT - If you want the audit results to appear in
place of other text, select FEEDBACK REPORT and then
select the type of feedback report to include. If you select this
option, do NOT also attach the feedback report to the email. When
this option is selected, signatures and any images provided by
the auditor are also sent. This message type will support display
of signature and images that are in the feedback report.
|
If you're sending a FAX message and
want to include the audit results, be sure to select the
FEEDBACK REPORT option. If you're sending an EMAIL message,
you can send a text message, and then attach a feedback
report to it. |
- Click SAVE & RETURN.
- Click the Recipient Type - EDIT link.
- Select the RECIPIENT TYPE from the drop-down list:

|
Be sure that a valid email address or
fax number exists for the specified recipient type. If no
fax or email address exists, then feedback cannot be sent. |
- USER - Feedback will be sent to the email address or fax number*
associated with the user you specify. **See note below.
- AUDIT RESULT - Feedback will be sent to the email or fax* specified
at the time the audit was approved.
- QA MANAGER (also referred to as AUDITOR or COMPLETED BY) -
Feedback will be sent to the email or fax* associated with the
auditor who conducted the audit.
- LOCATION - Feedback will be sent to the email address or fax
number* specified for the location where the audit was conducted.
- LOCATION PRIMARY CONTACT - Feedback will be sent to the specified
email address or fax number* of the person designated as the primary
contact for the location where the audit was conducted. **See note below.
- MANAGEMENT - Feedback will be sent to the email/fax* associated
with the management group to which the location is assigned.
- MANAGEMENT PRIMARY CONTACT - Feedback will be sent to the email/fax*
specified for the person designated as the primary contact for
the management group in which the location resides. **See note below.
- LOCATION SECONDARY CONTACTS - Feedback will be sent to the
email/fax* specified for the person(s) designated as the secondary
contact for the location where the audit was conducted. **See
note below.
- CONTACT GROUP - Feedback will be sent to the specified person(s)
designated in the Contact Group regardless of each person's Relation
Type status. Using Contact Groups is an optional feature.
See Creating
a Contact Group.
|
Some RizePoint clients conduct
audits at secondary locations, also referred to as "Physical
Locations." If the SQS option SecondLocations is enabled,
the dropdown menu for Recipient Types will have three additional
options from which to choose: Multiple Location Contacts,
Selected Customer Recipients, and Selected Supplier Recipients.
For a description of Secondary Location Recipient Types, see
Secondary
Locations. See also Physical
Location. |
- Click SAVE. If you selected USER as recipient type, a list of users
is displayed. Select the user to whom you want feedback sent. NOTE:
Be sure an email or fax number* exists for the user you select.
- Click RETURN.
|
*The
EMAIL option is the recommended notification method. Because RizePoint
has no control over the state of the equipment on the receiving
end, the FAX option may be less reliable than EMAIL. In addition,
the FAX option may be expensive, depending on the number of notifications
that are sent. Before using the FAX recipient option, both U.S.
and International users should check the fax rate at http://maxemail.com/fax/intl_price.html.
When using the FAX option, the
fax number associated with the specified recipient must be in
the proper format. It must appear exactly as dialed from the U.S.
If the fax recipient is located outside the U.S., the number must
be preceded with 011. Use NO spaces or dashes; use only numerals:
enter 011, followed by the fax number. |
|
**There
is a Web Configuration option, PREVENT
AUTOMATED EMAILS FROM BEING SENT
TO INACTIVE USERS, that allows you to prevent automated feedback
from being sent to inactive users in the system. When enabled,
if the recipient type is designated as USER, LOCATION CONTACT,
or MANAGEMENT CONTACT, then no email or fax will be sent if the
user or contact is currently designated as INACTIVE, even though
all other conditions of the automated feedback rule are met. |
ADDING ATTACHMENTS
TO FEEDBACK (EMAIL ONLY)
If you're sending feedback via EMAIL, you may attach feedback reports
to the email. Attachments are specified for EACH recipient.
- In the RECIPIENTS field, select the recipient. Notice that you
may click on the FEEDBACK METHOD, SUBJECT, or RECIPIENT TYPE link.

- Click the Attachment EDIT link.
- Check the box beside the report
that you want to attach. Note that only those feedback reports associated
with the selected audit form(s) are listed.
|
If you've already configured this feedback
rule with the FEEDBACK REPORT Message Type, do not also attach
the same feedback report here. Either configure the rule with
the Message Type: TEXT MESSAGE, then attach the feedback report
here -- OR -- simply specify the Message Type as FEEDBACK
REPORT. (See Setting Up the Feedback Message: Message Type,
above.) |
- From the FEEDBACK FORMAT droplist, select the format in which you
want the report to open:
- ORIGINAL FORMAT - In almost all cases, the original format
of a report is HTML. However, if you've had RizePoint create a
custom version of this report in another format, then Original
Format refers to that format. This format will not support display
of signature and images.
- PDF - If you select this option, the HTML report is converted
to PDF, and this PDF file will be attached to the automated feedback
message. (Requires that the original format of the report
is in HTML.) PDF will support
display of signature and images.
- EXCEL or WORD (Optional - See Opening
Feedback Reports in Word or Excel. Note that these formats,
if available, also require that the original format of the report
be in HTML.) Excel or Word formats
will not support display of signature and images.
- In the Attachment Name field, type a name for the attachment. you
may enter a name for the attachment (optional). Do not use any of
the following characters in the Attachment Name field:
; < > : " / \ | ? *
|
The Windows operating system does not
permit using these characters in any file name. |
You may, however, include replacement
tags in the Attachment Name.
- Click SAVE & RETURN.
Notice the REPLACEMENT TAG FILTERS link. Even when your attachment
name does not contain a replacement tag, this link is active so that
you may view the tags that are available. However, if the name contains
no tags, all of the fields are disabled. Only tags included in the
attachment name are available for filtering.

- To use the filters, click the REPLACEMENT TAG FILTERS link to open
the Replacement Tags screen.
If your attachment name contains a replacement tag, you may use
filters to remove part of the tag. For example, perhaps all location
names are preceded or followed by a series of numbers. If desired,
you can use the filters to remove all numbers from the location name.
Another example: Perhaps you want to include only the first part of
the Subject line in the attachment name. You could specify to use
only a specified portion of the subject line.
- Configure the replacement tag as desired, then click OK to close
the Replacement Tags screen.
- If you're using languages, click the Language - EDIT link to specify
the language in which you want the attachment to appear.
- Click RETURN.
SEARCHING FOR CRITICAL QUESTIONS IN AN
AUTOMATED FEEDBACK RULE
In an Automated Feedback Rule, you can search for critical questions
in a single category, or across multiple categories.
To search for critical
questions in a single category:
- Go to System > Correspondence
> Automated Feedback Rules.
- From the list of rules, click the rule you wish to perform
the search in.
- Click the number under the Audit Forms Constraints column.
- Click Add.
- From the Audit Category drop-down list, select the category you
wish to search in for the critical questions.
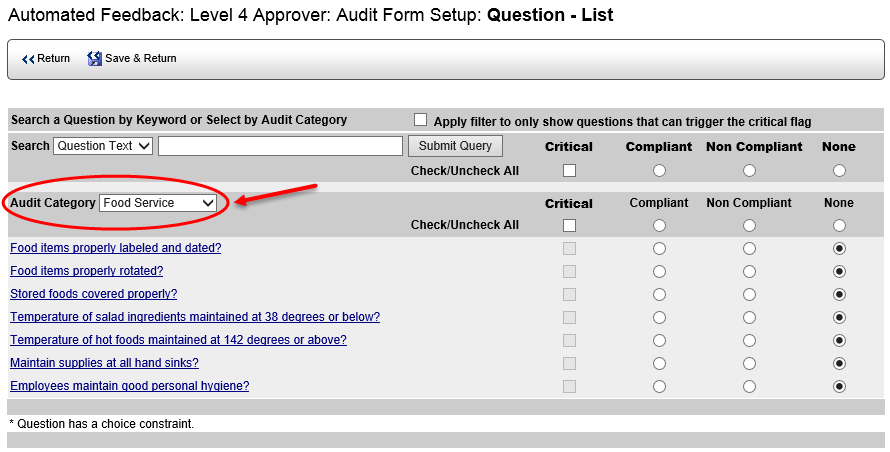
- Click Save & Return.
To search for critical
questions across all categories:
- Go to System > Correspondence
> Automated Feedback Rules.
- From the list of rules, click the rule you wish to perform
the search in.
- Click the number under the Audit Forms Constraints column.
- Click Add.
- Click the Apply filter
to only show questions that can trigger the critical flag checkbox.
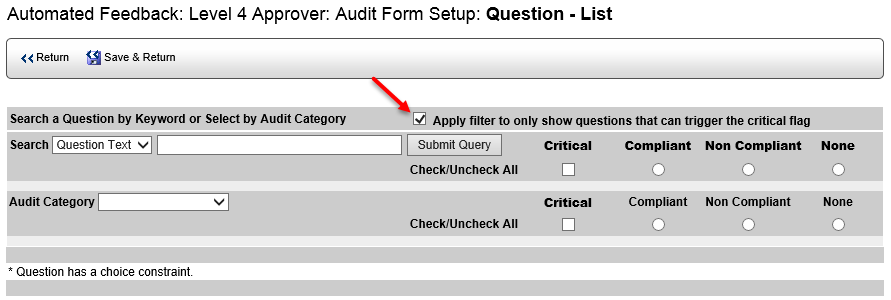
- From the Audit Category drop-down list, select All
Audit Categories.
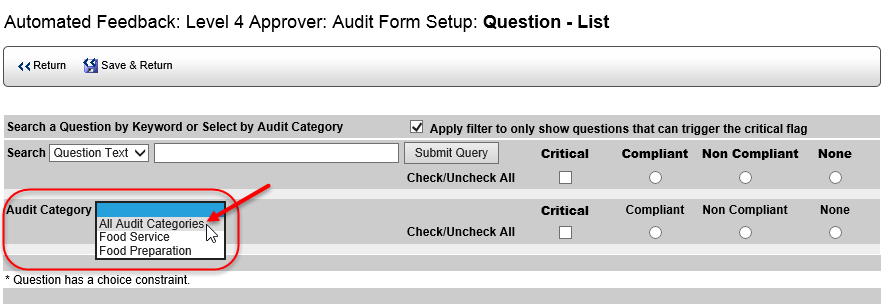
- Click Save & Return.
 |
*OPTIONAL
FEATURE - Contact your RizePoint representative to enable this
option. |